Thursday, June 28, 2018

A Paper Pumpkin Thing, Broadway Star Hop


 Hi Crafty Friends!
It's time for a Paper Pumpkin post. I'm hopping with lots of super talented demos, sharing fun projects featuring the June kit, called Broadway Star.


I love this kit, it's bold and bright, and pretty darn nice right out of the box. AND it coordinated with our Broadway Bound suite! Can you say, WOW?
We went out of town this past weekend to visit my Mother in law, so I grabbed my kit, some of the Broadway Bound suite, my trimmer and off we went. After some swimming in the pool, good eating, game playing, (you can call me the Rummikub champ) a visit to the beach, and a nap, I spread out my supplies and got to playing.


Here's one of the cards I made while I was there:


I just love all the gold and Lovely Lipstick together. The cool thing is, I think this card could go to most anyone. I do think they should have gave us bunches of the gold self adhesive sequins. 
I love them.
I had plans for my next project, but I needed to wait till I got home and could use my 12x12 paper. 
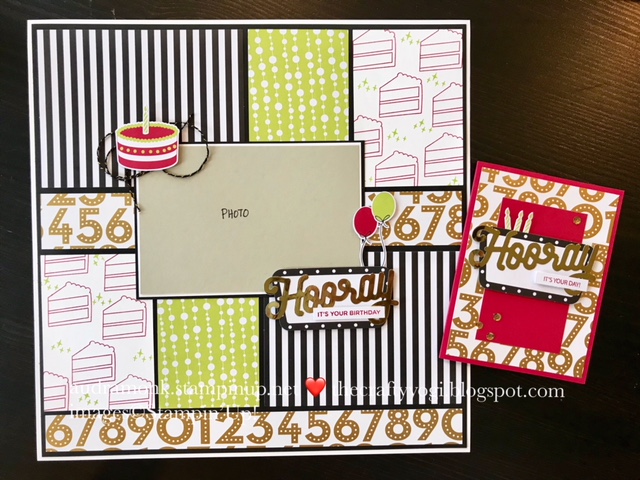
I made a scrapbook page!


Isn't it great! I used the cards from the kit as well as the cake stamp to decorate the background as well as a couple of strips of the Broadway Bound DSP. Now all I've got to do is add a pic.

Here are the measurements:
12" x 12" Whisper White
11 3/4" x 11 3/4" Basic Black
The DSP strips are: 1" x 11 1/2" and 1 1/2" x 11 1/2"
The black and white stripes are one of the card bases cut in half ( 4 1/4" x 5 1/2")
The Lemon Lime green with dots are one half of a card base, cut in half again ( 2 3/4" x 4 1/4")
Whisper White, stamped with the cake and sparkle images, 3" x 4 1/4"
The photo backing rectangle is, Basic Black, 4 1/4" x 6 1/4" and Whisper White, 4 1/8" x 6 1/8"
The photo will be 4" x 6"

I had such a fun time using this kit and the coordinating suite from the annual catalog.


Thanks so much for stopping by. I've seen a teaser of the July kit (can we say picnics with wood and gingham???). I know you'll want to join in the fun. Order by July 10 to receive the July kit. Our kits are great for beginners as well as experienced stampers. 
Go to https://www.paperpumpkin.com/ and pick me as your demo.

In closing, here are a few pics from my North Carolina visit.

Stay Crafty!
Audra

For more inspiration, click on the names below.


Tuesday, June 19, 2018

Home Decor SU Style Blog Hop

Hi Crafty Friends!
I am very excited to join in on a SU home decor blog hop.


I'm sharing this month's framed art sampler.


In this month's class, we're making an Americana themed sampler featuring lots of red, white, and blue, as well as lots of summer themes.

I love designing these to share with others and to display around my house. I'll admit they are a little bit addicting. I may have made way more than I can display, good thing they also make great gifts.


Let's talk about measurements.

Whisper White base, 9" x 9"
Lovely Lipstick, 8 1/2" x 8 1/2"
Crumb Cake, 8 1/4" x 8 1/4"
Large Square: White Wood Textures DSP, 4 1/2" x 4 1/2", Lovely Lipstick, 4 3/4" x 4 3/4", 
Blueberry Bushel, 4 7/8" x 4 7/8"
2 Rectangles: White Wood Textures DSP, 2" x 4 1/2", Lovely Lipstick, 2 1/4" x 4 3/4", 
Blueberry Bushel, 2 3/8" x 4 7/8"
Square: White Wood Textures DSP, 2" x2", Lovely Lipstick, 2 1/4" x 2 1/4", 
Blueberry Bushel, 2 3/8" x 2 3/8"

Now let's talk about what stamp sets were used.


This element features the Lift Me Up stamp set and the Up & Away thinlits. I used one of our new Pearlized Doilies in two of the corners.


I love this piece! It says it's all about summer to me. The chair is from one of my favorite stamp sets ever, Colorful Seasons. The "fireworks" are from our new Birthday Backgrounds set.


I had so much fun making this cute little scene. The star of the show is the cute little bull dog from the Sitting Pretty set and the bench! Do you not love how cute it is? The Pretty Park framelits dies are so cool. I also used the sweet little topiary plant from Vertical Greetings. I colored it using our Stampin' Write markers. The America banner is from the Pick A Pennant set, and let me tell you, my Stamparatus was awesome in helping me stamp this. To add dimension and a little more color, I added a Stitched Shapes Framelits circle (I know, I adore these and use them all the time) backed by a Layering Framelits scalloped circle.


This last square has no stamping but show off some of our new framelits. The "wreath" and little heart are from the Stitched Labels Framelits. The star is from the Wood Crate Framelits.


I hope I've inspired you to make a framed art piece to display in your home.
Any questions, let me know. I am happy to help.


For more inspiration, click on any name in the list. Thanks so much for stopping by.
Stay Crafty!


Wednesday, June 6, 2018

ICS Blog Hop, New In-Colors and Varied Vases

Hi Crafty Friends!
It's the first Wednesday of the month and that means, it's time for the Inspire, Create, Share blog hop.


And this month, we are showing off the new 2018-2020 Stampin' Up In Colors. They are so lovely and bright, let's take a look.


This pic doesn't quite do them justice. Let me wow you with how awesome they are, especially when accompanied by the Varied Vases bundle.


I just love these colors, and I know that I will have fun creating with them for the next two years. 
Here's a short video I made last month that explains our in colors and our new redesigned ink pads.


Now, let's take a closer look at my cards.


Isn't the vase super cute? The stamp set has a coordinating punch for the vases, making the creating quick and easy.


I've used the new In Color 6x6 Designer Series Paper and the new In Color ribbons. We'll be making one of these cards at my Open House event coming up on this Sunday, June 10. I'm going to mix and match the colors in the packets, so people can have fun exploring the new in colors. 
It's all so pretty, I can hardly contain myself! 


Thanks so much for stopping by my blog. I know you are going to want to continue on and see what Mary Kate has to share. Click her name or the button below.


As always, need help shopping, have questions, just want to say hi, contact me.
Happy Crafting!


Friday, June 1, 2018

Ribbon and Paper Shares

Hi Crafty Friends!

I am so excited about the start of the new Stampin' Up catalog. It is full of tons of amazing craft supplies. I can't wait to put my order in and to get crafting with all the new stuff! Too bad I can't buy it all... Maybe you feel the same way? I have a solution in regards to the new ribbon and paper.

I am hosting a ribbon and paper share!
It's a great way for you to get a little bit of lots of things.


Let's talk ribbons first.

There are four options:

2017-2019 In Color ribbons, 2 yards each of 5 colors. $9.25 (shipping $3)
Berry Burst, Fresh Fig, Lemon Lime Twist, Powder Pink, and Tranquil Tide

2018-2020 In Color ribbons, 2 yards each of 5 colors, $7 (shipping $3)
Blueberry Bushel, Call Me Clover, Grapefruit Grove, Lovely Lipstick, and Pineapple Punch

All the Other Ribbons That Are New, 1-5 yards of each (style and color) depending on style, $32 (shipping $7)
Leaf Ribbon (1 yard), 1/8" Cord (2 yards), 1/4" Mini Striped Ribbon (2 yards), 3/8" Cotton Ribbon (2 yards), 5/8" Polka Dot Tulle Ribbon (2 yards), 1/2" Textured Weave Ribbon (2 yards), Nature's Twine (1 yard), Silver Baker's Twine (5 yards), Medium Baker's Twine (3 yards), 1/2" Satin Ribbon (2 yards), 1/4" Velvet Ribbon (2 yards), Tea Room Ribbon Combo Pack (1 yard), Metallic Ribbon Combo Pack (1 yard)

 All The Ribbons, everything listed above, $49 (shipping $7)

Want more? You can order multiple shares!
Contact me, audramonk@yahoo.com for total and payment options. 
I will combine shipping when possible.
Live local? Pick up at my house and no shipping charges.
Are you a demo? You get a discount!

NOW, let's talk paper.

There are so many new and wonderful Designer Series Papers. And I want to get them in your hands ready to go. I am offering paper shares, Cut and Ready! I know, so cool! 
For each share, you will receive 18 card bases (6 each of 3 colors, not scored) and 18 pieces of DSP cut to 4" x 5 1/4" (3 each of 6 designs).


Options:

Designer Series Paper packs with coordinating card stock, $7 each, ($5 shipping) 
1 of each, $49 (shipping $7)
Twinkle Twinkle, Under the Mistletoe, Nature's Poem, Petal Promenade, Tranquil Textures, Animal Expedition, Best Route

Broadway Bound Speciality Designer Series Paper, $8 ($5 shipping)

Tea Room Speciality Designer Series Paper, $6 ($4 shipping)

All the Papers, $63 ($7 shipping) 1 set of each as listed above 

Contact me, audramonk@yahoo.com for total and payment options. 
I will combine shipping when possible.
Live local? Pick up at my house and no shipping charges.
Are you a demo? You get a discount!

Want All The Ribbons and All The Papers?
$117 (this price includes discounted shipping) Local? $112


Want to take a closer look at the ribbons and papers? Click HERE or the catalog image below to go to my online store and check out the catalog.


First share order is being placed on Sunday, June 3, at 7pm.
Next share order is going in Sunday June 10 at 7pm.

I'm here to help with all your crafty needs, contact me for more info.
Stay Crafty!

Thursday, May 31, 2018

A Paper Pumpkin Thing Blog Hop, Manly Moments

Hi Crafty Friends!
Oh my, these Paper Pumpkin kits. They just keep getting better and better. I love this month's kit. I love it! The paper, the stickers, the tree die cuts. I'm very happy to be joining in on this month's Paper Pumpkin Thing Blog Hop.


Let's take a look at my alternative projects this month.


The shields with the trees make me think of all of our National Parks in the US. I love exploring parks. If fact, I've always wanted to be a park ranger. There's something about walking around in the woods that I just love. 
I made a really fun card and I decorated one of our super cute mini pizza boxes.


I had fun layering the trees on the shield. 
I'm thinking my Dad is going to like this card for Father's Day.

Our pizza boxes are so fun. They are food safe, but you can also put a gift card or other small gift inside too.


I hope I've inspired you to explore more with your Paper Pumpkin kit. Not a subscriber yet? Contact me for more info. Check out the rest of the blog hop for lots more ideas!


Wednesday, May 16, 2018

Dreaming of the Beach Framed Art Sampler

Hi Crafty Friends!

I am super excited to share this month's framed art sampler with you.
It's all about the beach.


I love everything about it! The colors, (a new one!) the images, and the feel of it.
This project uses only five colors! Crumb Cake, Soft Sea Foam, Night of Navy, So Saffron, and Early Espresso.
Here are the measurements:

Crumb Cake, 9" x 9"
2 small squares: Whisper White, 2" x 2", Soft Sea Foam, 2 1/4" x 2 1/4", Night of Navy, 2 3/8" x 2 3/8"
2 medium rectangles: Whisper White and Wood Texture DSP, 2" x 4 1/2, Soft Sea Foam, 2 1/4" x 4 3/4", Night of Navy, 2 3/8" x 4 7/8"
Large rectangle: Whisper White, 2" x 7 1/8, Soft Sea Foam, 2 1/4" x 7 3/8", Night of Navy, 2 3/8" x 7 1/2"


The left top square is the sand, sea, and birds from the High Tide set. The middle square uses the Sea of Textures stamp set and the coordinating Under the Sea dies.


The vertical medium rectangle shows off the lovely lighthouse from High Tide, I used the Stamparatus to make stamping the light house easy. It's stamped in Crumb Cake and Night of Navy.


I love this middle panel! It's the feature of the project. It shows off the Sea of Textures stamp set and the Under the Sea framelits. There are so many fun details in this bundle.


The bottom panel is so peaceful. The sea is created by stamping the water stamp from High Tide lots of times in Night of Navy. Then I stamped and colored two sets of the sweet little boats from the Lilypad Lake set. Luckily there are framelits to cut out the boats. And the cute little sun die cut is in the same set.

I hope you like it as much as I do. It would be a great gift or great to keep for yourself.
I put it in a 9" x 9' shadow box frame from Michael's.

The new color and stamp sets will be available in our new Annual catalog starting June 1. Or join my team now and you can order them in your starter kit! Join my team before May 31 and I'll make a sampler for you for free! Frame not included.

I have catalogs! If you're local, get one in any class, or message me (audramonk@yahoo.com) to stop by and pick one up. I'll also have them (and lots of free fun) at my Open House event on June 10. Live farther away? If you've ordered from me in the last 6 months, I'll send you one free. Haven't ordered in a while? The catalog is still free, you just pay $7 for shipping.

Thanks for checking out my blog today.I hope that you will add samplers to your crafty time. They are so much fun. I love comments, so feel free to leave one. 
I'll close with some pics of the project all framed up.


Stay Crafty!
Audra


Monday, May 14, 2018

Color Revamp and Color Organization

Hi Crafty Friends!

I am so excited to share all the new Stampin' Up colors with you...but first, I've got to share a little about my last week. 
(Read on to see a video on the color revamp and info on how I store my paper and inks.)

My middle child graduated from college in Florida. So we went to Florida to celebrate and then move him home to Maryland while he looks for a job. (If you know anyone looking for a newly graduated mechanical engineer/CAD designer, let me know). And what an adventure it was.

 Here we are after the long graduation ceremony.

We took some fun graduation pics on the beach.

Then we went to Disney World with the Grands to celebrate.

Then we packed up his apartment and drove the U-Haul truck with the auto transport 830 miles.

Was I glad when we got home and it was over!!

While we were driving, my husband, who got to fly home so he could work, texted me a pic of my Stampin' Up boxes that had arrived.


I was pretty excited, but so tired so I didn't open them till Sunday. BUT oh my goodness, once I did...the new colors! Take a look at this video to see all of the lovely new colors.


Click HERE to see the video on YouTube.

Now that you've seen the new colors, I thought I'd share how I store my paper and inks. My craft area is in a corner of the main living level in an open concept house. A couple of years ago, I invested in a truly amazing desk from Stamp-n-Storage. I did a blog post a few years ago, you can see more HERE. Anyhow, I store my inks in the slots of the desk, and I store them kind of in rainbow order. By kind of, I mean rainbow-ish order, but not strict. I put the reds together, the blues together, greens together, etc. Having them in this order can help inspire me when I'm creating. I'll be swapping out the retiring colors with the new colors soon.


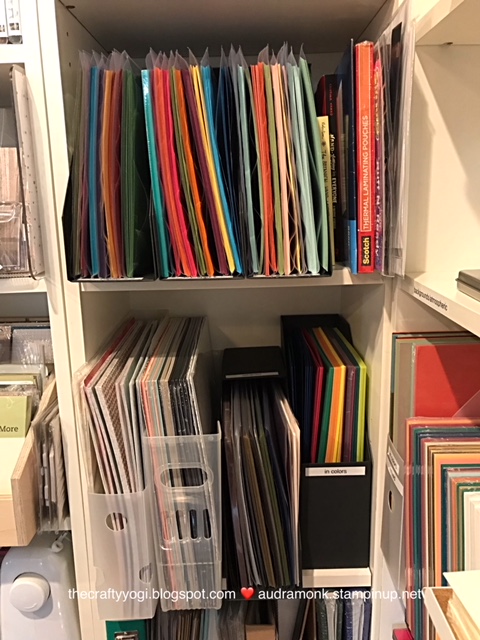
Paper is stored in magazine files on Ikea Billy shelves on the wall behind my seat. 
I store the paper by SU color families, Regals, Brights, Subtles, and Neutrals.


The three color families are on a shelf together. On the lower shelf, I have 12 x 12 mini catalog DSP and 12 x 12 color packs. Then the Neutrals collection and the In Colors.
The shelf to the right has my Whisper White, Very Vanilla, and Basic Black. And currently I have retiring paper next to that.


Thanks for checking out my blog today. I hoped you enjoyed it. A little bit of family, new colors, and some info on how I organize. As always, if you have questions, ask. I am happy to help.

Stay Crafty!
Audra