Tuesday, July 30, 2019

It's All About the DSP, Volume 3 Tutorial

Hi Crafty Friends!
This is the last post in my three part series about DSP. As you may already know, I love Stampin' Up Designer Series Paper. In my opinion, it's the best ever! For my final post, I decided to make a Sunburst card. They are a bit messy, but lots of fun. I used the Dinoroar Suite, it is so cute.


Gah! I just love them all!! I'll give a few measurements, but watch the video posted at the bottom of this post for lots of helpful tips. 
For all the projects, the DSP is cut to 1 1/2" x 4" and then cut into triangles.


I attached the DSP triangles to a 2 3/4" x 5" piece of Lovely Lipstick card stock. I left small even spaces between the triangles. Then I backed that with Old Olive card stock cut to 2 7/8" x 5 1/8". The card front is the standard 4" x 5 1/4". I embossed it with the Mosaic 3D folder.


This one is pretty similar, but I butted the triangles right up to each other, and then cut down the DSP piece to be 1/4" smaller than the background piece. 


On this card, the Pineapple Punch card stock piece is 3" x 3". Then backed by a Pretty Peacock piece 3 1/8" x 3 1/8". I think this is such a fun card.
 I'm planning to give it to my husband next week for our anniversary. 

Here is the video tutorial. (Don't mind my stuckness at the end when I couldn't get my dimensionals to work properly!)


Click here, audramonk.stampinup.net to shop for any of these products.

Want to get lots of free products? Join my team! Until August 31, SU has a bonus offer of an extra $30 of free product in your starter kit. Then you can get all your products at a discount! Ask me for more details.

Stay Crafty!
Audra


Thursday, July 25, 2019

On My Mind, A Paper Pumpkin Thing Blog Hop

Hi Crafty Friends!
Happy Summer! We are in full summer mode here on the east coast. I am in fact enjoying a beach vacation the very moment I'm writing this. And thinking about said vacation is what inspired me for one of my alternative projects, but I'm getting ahead of myself, let's start at the beginning.

It's time for a super fun blog hop with the Paper Pumpkin Thing crew.

July's Paper Pumpkin kit is called On My Mind and it features three different sets of cards that coordinate with three different suites in the annual catalog.


It is such a nice kit! Great for all levels of stampers. For a closer look, check out this video:


I was definitely in a summer beach vacation mind set when I made this project for the blog hop. I made my own Memories and More cards! I am a scrapbooker. But not the super fancy type. I like pages that can go together quickly. And I love Stampin' Up's pocket pages and Memories and More cards. So I opened up the Come Sail Away card pack and then just started playing with the cards and stickers and with the Paper Pumpkin supplies. 
I know that I am going to enjoy using these cards when I get home from our trip.


These cards and the ones in the pack will be fun to use scrapbooking pics like this one from our beach vacation. 
This is a selfie of my husband and I with our three adult kids in the ocean in the background.


My card alternative really has nothing to do with the beach, so it would be great to send to anyone celebrating a birthday.


Everything is from the PP kit except the card base, which is a piece of Night of Navy card stock.

I hope that I've inspired you a bit for alternative uses for your July kit. 
For more inspiration, click on the names below.


Not a Paper Pumpkin subscriber yet? Go to paperpumpkin.com to join the fun and if you don't already have a demonstrator, choose me at check out. Next month's kit has a fall theme with gift bags and tags and there is an optional card making add on bundle (for just $10!) that you can purchase in my store, audramonk.stampinup.net starting August 1. But you must be a subscriber to do so! Have questions? Email me, audramonk@yahoo.com.

Happy Crafting!
Audra


Tuesday, July 16, 2019

It's All About the DSP, Volume 2 Tutorial

Hi Crafty Friends!
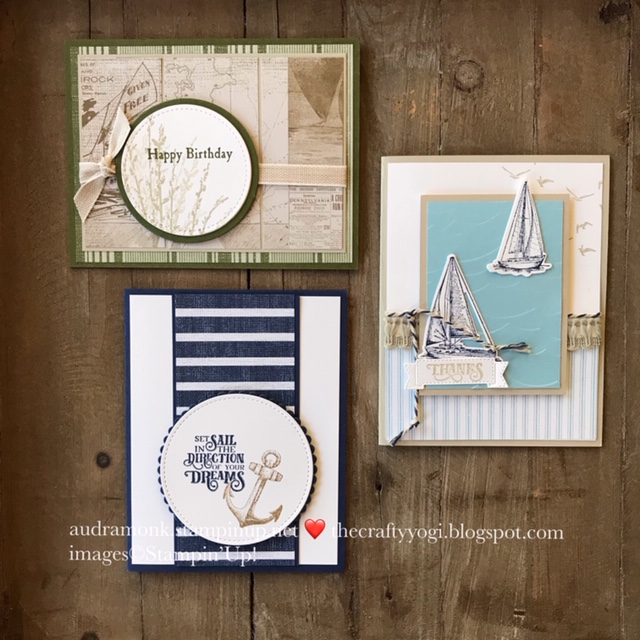
I'm back with more DSP fun. Today I have three more DSP design styles to share and a tutorial video with lots of tips. I used the Come Sail Away DSP.


First up is the Open Space card. That's what I call a card where you just use the DSP for just part of the card. I used the coordinating Sailing Home stamp set and dies and the High Seas 3D embossing folder. This is a fun style that uses just a little bit of DSP.


Next up is what I like to call a panel card. In this style of card, we cut the DSP apart and mount it with little spaces in between. I'm still using the Come Sail Away DSP, stamp sets used are Woven Heirlooms and Country Road.


Last up is a quick and easy card that uses a medium sized strip of DSP.


You can take a closer look at the cards in this video tutorial.


Thanks so much for checking out my post today. 
I hope you have a great time making fun cards using DSP.
Questions or comments, let me know! I'd love to help you with your crafting.
You can shop for all these lovely supplies on my website, audramonk.stampinup.net.
Want to get your products at a discount? Join my team!

Stay Crafty!
Audra


Friday, July 12, 2019

A Summertime Sampler

Hi Crafty Friends!
It is time to celebrate Summer, and I am looking forward to spending a week with our family at the beach soon. I was totally inspired by the east coast beaches that I love in the creation of this project.


Measurements in inches:
Whisper White, 9 x 9
Bermuda Bay, 8 1/2 x 8 1/2
Pineapple Punch, 8 1/8 x 8 1/8
Sahara Sand, 8 x 8

Long rectangle: Sahara Sand, 2 x 2 (tear into strips), Whisper White, 2 1/4 x 7 1/2, Granny Apple Green, 2 3/8 x 7 5/8
Medium rectangle: Whisper White, 2 x 4 1/2, Sahara Sand, 2 1/4 x 4 3/4, Costal Cabana, 2 3/8 x 7 5/8
4 squares: Whisper White, 2 x 2, Sahara Sand, 2 1/4 x 2 1/4, Coastal Cabana, Granny Apple Green, Bermuda Bay, and Pineapple Punch, 2 3/8 x 2 3/8

I put the project in a 9 x 9 Belmont shadow box frame from Michael's Craft Store.


Stamp sets used: Sailing Home, and Colorful Seasons, and the sand is from Seaside Notions. The sand is stamped in Sahara Sand, the birds and lighthouse in Soft Suede, and the sea grass in Crumb Cake.


I used Colorful Seasons (the Stamparatus is a lifesaver here!) and Seaside Notions. The Calypso Coral star is from the Under the Seas dies.


This part might be my favorite. I love the shells from Seaside Notions, we don't often find full shells on our east coast beaches now, but we love them in our decorating, I stamped them on Shimmery White with Sahara Sand and then gave them a quick color with our Blender Pens using the ink from the top of the ink pads. I used Pineapple Punch, Calypso Coral, and Coastal Cabana.


I used the retired Large Letters dies for the letters. I've accented the whole piece with the Iridescent Sequin Assortment.

I hope you feel a bit inspired to enjoy some beachy decor, and that you can create some yourself.


If you'd like to purchase some of our lovely stamp sets or paper, you can do so at my online shop: audramonk.stampinup.net.

Thank you so much for stopping by my blog.
Happy Crafting!
Audra


Tuesday, July 9, 2019

It's All About the DSP, Volume 1 Tutorial

Hi Crafty Friends!!
I am very excited to share volume 1 of my DSP tutorials. I love Stampin' UP DSP (that's Designer Series Paper, it's our artist created printed paper). It's a great weight, and perfect for all kinds of projects. Volume 1 covers the basics for using DSP in card making. I'll share pictures and info first and then there is a tutorial video, you can watch it here or on YouTube.


I love using DSP to make quick and cute cards. Often you can do just a little stamping, like for the sentiment, and add a few extra bits of paper and voila, you have some great cards. For these cards, I used the Pressed Petals Speciality DSP, #149500.

Pressed Petals DSP


Card1, in two different ways. Both use the Daisy Lane and Painted Glass stamp sets.
Measurements in inches and info for both cards:

Sympathy card:
Mossy Meadow, 5 1/2 x 8 1/2 (card base, fold in half)
DSP, 4 x 5 1/4, Whisper White (card for stamping) 2 1/2 x 4, Mossy Meadow, 2 5/8 x 4 1/8

Birthday card:
Pear Pizzaz, 5 1/2 x 8 1/2 (card base, fold in half)
Crumb Cake, 4 x 5 1/4, DSP 3 3/4 x 5, Very Vanilla (card for stamping) 2 1/2 x 4, 
Pear Pizzaz, 2 5/8 x 4 1/8

Card 2 in two different ways. Both use the Beautiful Bouquet stamp set and 
the 1 1/2 inch Punch and Pretty Label Punch.
Measurements in inches for both cards:

Birthday card:
Night of Navy, 5 1/2 x 8 1/2 (card base, fold in half)
Whisper White, 4 x 5 1/4, DSP, 3 7/8 x 5 1/8, cut at 2 inches

Thank you card:
Soft Suede, 5 1/2 x 8 1/2 (card base, fold in half)
Whisper White, 4 1/8 x 5 3/8, DSP, 4 x 5 1/4, cut at 2 inches

Card 3. Sentiment from the Seaside Notions stamp set. I used the Stitched Shapes dies and the Layered Ovals dies. The oval is sponged with Crumb Cake. The flower is from the Petals washi tape.

Measurements:
Crumb Cake, 5 1/2 x 8 1/2 (card base, fold in half)
DSP, 4 x 5 1/4, Crumb Cake, 3 x 4 1/4, DSP, 2 7/8 x 3 7/8

Want video instruction? Here you go! This class was a Facebook Live. There is a bit of a glitch at about minute 25, so don't mind my bit of flusterness (that's not really a word, but I'm using it anyway) there.


This is the first in a series, I'm thinking there will be at least two more installments. I love crafting with DSP and there are so many fun ways to use it!

Want to get your paper and other supplies at a discount? Join my team! Stampin' Up has an extra deal going on now until August 31. Get $155 in product (a make your own starter kit) for $99 (plus tax) with free shipping. Or, for the month of July, shop and get coupons to redeem in August. It's a pretty cool time to shop for some of the best paper crafting supplies around. See all the info here: audramonk.stampinup.net or contact me for more info.

Stay Crafty!
Audra


Thursday, June 27, 2019

A Little Smile, A Paper Pumpkin Thing Blog Hop

Hi Crafty Friends!
It's A Paper Pumpkin Thing Blog Hop time. 


This month's kit is so fun! The kit makes 16 cute little cards, perfect for tucking a tip or gift card into, or great for a small note. They're extra cute as they feature a fun beachy theme.


There's even a little pouch to tuck them into and keep them safe in your bag.
I have a longtime friend with a June birthday. She loves the beach! So I though it would be the perfect thing to make her a card and gift with the items in the kit.


I love these projects and I am sure she will too! I love the little framed art piece so much it's going to be very hard to part with...I'm thinking I'll figure out how to make something similar for myself.


Measurements in inches for the framed piece:
Frame is 5 x 7
Crumb Cake, 5 x 7
Early Espresso, 4 1/8 x 5 5/8
Whisper White, 4 x 5 1/2
2 card fronts, cut off and cut in half, 1 1/8 x 3 1/2
Other products used:
Lined Alphabet stamp set, stamped in Early Espresso on Crumb Cake, Layering Alphabet dies. Well Written dies (love), and Iridescent Sequins.


I added extra card stock to make a full size card.
Measurements:
Crumb Cake, 4 1/4 x 5 1/2 (fold in half, card base) and 3 7/8 x 5 1/8
Whisper White, 4 x 5 1/4 and 2 5/8 x 5 1/8
Coastal Cabana (isn't that the best color name ever?) 2 1/4 x 5 1/8
From 2 of the card fronts, 1 1/2 x 2 1/4


I used some of the included stamps to accent the sentiment (from a past Paper Pumpkin kit) on the inside. I stamped off once to get a softer color.


I'm pretty sure my friend is really going to enjoy getting this package in the mail.

These Paper Pumpkin kits are so fun as is and for creating new and different things. You'll definitely want to subscribe by July 10 for next month's kit. It's nautical themed and makes full size cards, while coordinating with 3 different suites in the annual catalog. You can go to https://www.paperpumpkin.com to subscribe. If you don't already have a demonstrator, choose me when checking out.

For more inspiration with this month's kit, clock on the names below.


Saturday, June 22, 2019

A Celebration of Small Town America Sampler Project

Hi Crafty Friends!
My summer has started off busy and full in a good way, but it sometimes puts crafting on the back burner. Which is sometimes frustrating as there is so much fun summer stuff to craft! Today I am sharing my July sampler. My in studio class is usually the last 4th Wednesday of the month, so we make a project to display for the following month. And I love this one!


Measurements in inches:
Whisper White: 9 x 9
Night of Navy: 8 1/2 x 8 1/2
Real Red: 8 1/4 x 8 1/4
Balmy Blue: 8 x 8
Medium Rectangle: Balmy Blue, 2 x 4 1/2, Night of Navy, 2 1/4 x 4 3/4, Real Red, 2 3/8 x 4 7/8
Small Squares: Balmy Blue (1) and Whisper White (2) 2 x 2, Night of Navy (4) 2 1/4 x 2 1/4, Real Red (4) 2 3/8 x 2 3/8


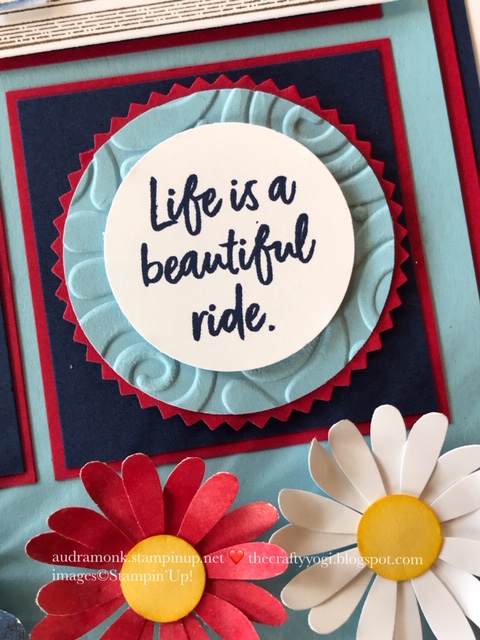
Aren't these daises so cute? They are so fun to make! The red and blue paper is from the See a Silhouette DSP and Whisper White, I used the new Medium Daisy Punch. Each flower uses 2 punched flowers and the centers are Daffodil Delight punched with the 1/2 inch punch and sponged with the same color. I used the Swirls and Curls embossing folder on the Balmy Blue pieces. I used the new Hand-Lettered Prose dies to cut out the USA which are popped up with Foam Strips. The fireworks come from the Birthday Background stamp set, I colored on the red rubber stamp with our Stampin' Write markers (don't use Blends!). I added Red Rhinestone Basic Jewels to make them sparkly.


This gazebo is so cute! I used the Bokeh Dots stamp set for the fireworks behind the gazebo and the Pretty Pavilion bundle for the gazebo and it's accessories. The gazebo is stamped in Soft Suede, and the plant is stamped in VersaMark and embossed in white and then colored with Blender Pens. The red bunting uses the See a Silhouette DSP. The fireworks on the Balmy Blue background are just like the ones on the white square.


I love this truck from the Ride with Me bundle! I stamped it in Momento and colored it with Stampin' Blends in Night of Navy (it looks super cute in Real Red too!) and then fussy cut it out. I used the coordinating die for the balloons. The sweet little dog is from the You Always Deliver set. He's stamped in Momento ink and colored in Soft Suede Stampin' Blends.


You'll need your punches for this square. I used the Starburst punch, the 2 inch punch, and the 1 1/2 inch punch. The sentiment is from the Ride with Me stamp set. Use lots of Dimensionals in your layers here.


Add a row of the cute little daises to the bottom.


I love these 9 x 9 shadow box frames from Michael's, they come in all colors.


Thanks so much for checking out my blog. If you need a catalog or a demonstrator, let me know as I'd be happy to help. 
You can shop 24/7 on my website, audramonk.stampinup.net. If you make one, let me know!
For more frequent inspiration and info, follow me on Facebook, The Crafty Yogi 
or Instagram, @audramonk.

Stay Crafty!
Audra

The dog (Lissa) and I on a car ride to Granny's house in North Carolina.


We made a stop in downtown Wilmington at Boombalatti's for ice cream.