In case you haven't noticed, I love Stampin' Up Designer Series Paper (DSP). I want to share the love, so I am offering a DSP Paper Share. This is a way for you to get a piece of each paper.
So let's take a look at all the beautiful paper we have in this catalog.
What do you get? You get 6 x 6 inch pieces of DSP, individually packaged by type and labeled with the name and the coordinating colors.
Option 1
2 pieces of each double sided design. $50 (plus $7 for shipping if needed)
On my team, you get a 20% discount!
Option 2
1 piece of each double sided design. $27.50 (plus $7 shipping if needed)
On my team, you get a 20% discount.
Ordering windows: Sept 3 or Sept 8. Reserve your share by the dates indicated with payment. Email me at audramonk@yahoo.com to request your invoice.
I have pictures too!
Feels Like Frost
Monster Bash
Come To Gather
Brightly Gleaming
Toile Tidings
Let It Snow
Wrapped In Plaid
Night Before Christmas
DSP is a great way to enhance all your projects! Like this card we'll be making at my Christmas Just Cards class on September 4.
Want to know more about my classes? See the schedule on my website.
Want to get all your paper at a discount? Join my team! We currently have an Extra Extra promotion going on. Join for $99 and choose $155 in product! Contact me for more info, audramonk@yahoo.com or click Join the Fun on my website.
Let's celebrate the goodness of the garden. The hard work and the bounty that the earth can provide. As well as the beautiful flowers that will soon end their blooming as summer winds down.
I really enjoyed making this project. The stamp set is awesome. It's called Garden Goodness (#149250). It's a two step photopolymer stamp set. Since the stems are stamped separately from the veggies, it's easy to use different colors. The Stamparatus makes it even easier! See the video below for tips on how I stamped the peppers.
Measurements in inches:
Whisper White: 9 x 9
Early Espresso: 8 1/2 x 8 1/2
Poppy Parade: 8 1/8 x 8 1/8
Crumb Cake: 8 x 8
Rectangles (3): Whisper White 2 x 4 1/2, Garden Lane DSP 2 1/4 x 4 3/4,
and Early Espresso 2 3/8 x 4 7/8
Squares (3): Whisper White: 2 x 2, Garden Lane DSP 2 1/4 x 2 1/4, and Early Espresso 2 3/8 x 2 3/8
9 x 9 Belmont Shadow Box Frame from Michael's
I stamped the tomatoes in Poppy Parade and the stems in Garden Green. I stamped the tomatoes again on some scrap paper and cut three of them out and popped them up on Mini Dimensionals.
I stamped the peppers in Poppy Parade and Garden Green on the paper and then another pepper in Crushed Curry on scrap. The stems are stamped in Mossy Meadow. See the video below for how to use the Stamparatus (and our shammy) to get perfect peppers every time. The yellow pepper is fussy cut and then popped up on dimensionals.
Need tips on how to line up your stamps on the Stamparatus? See this video:
And back to the info we go...
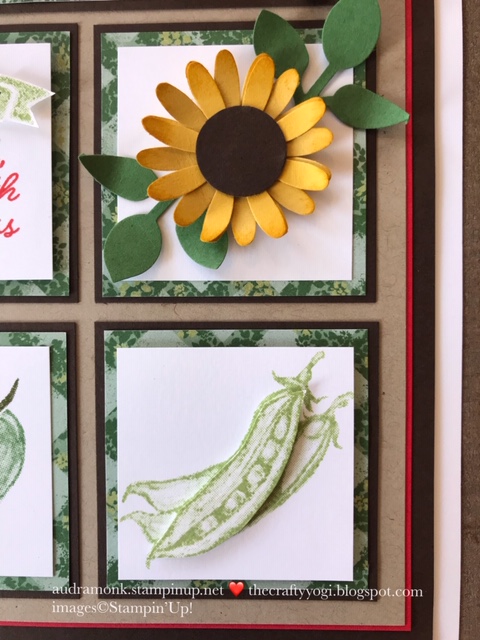
The peas in the pod are stamped in Pear Pizzaz. I went with the stamp the background and stamp some scrap paper process again. I fussy cut just the front pea pod and used dimensionals to pop it up.
I love this sentiment from the stamp set! Good luck, good health and happiness, it's a wish we all can use. The banner is stamped in Pear Pizzaz and the wishing you sentiment in Early Espresso. Some more fussy cutting and more domensionals.
The words stamped on the 2 x 2 square are in Poppy Parade.
Now let's talk about the sunflowers!
I've made two small ones using the Medium Daisy Punch (149517) and the retired 3/4 inch Circle Punch, but I totally think you could use the 1 inch Circle Punch as is or trim it down a bit. The bigger flower is made with the Daisy Punch (143713) and the 1 1/8 Scallop Circle Punch (146138). Each flower uses three of the flowers punched in Crushed Curry and then I sponged the edges in Crushed Curry. The centers are punched in Early Espresso. I curled the ends of the petals with my bone folder and assembled the flowers with Mini Glue Dots. The leaves are in Garden Green and use the Leaf Punch (144667). The leaves are attached with the mini glue dots to the 2 x 4 1/2 rectangle and the 2 x 2 square and then the flowers on top with dimensionals.
And there you have it! It's a great project using just one stamp set.
Come to the Crafty Corner on August 28 and create it or, I'm offering this as a To Go Class.
The Crafty Corner in Studio class is $25 and an additional $10 if you need a frame.
Please rsvp by Monday 8/26 to reserve your spot.
The To Go Class includes the Garden Goodness stamp set ($19.82 value) and all the prepped paper and die cuts (DSP may vary). You'll just need to add ink, some fussy cutting, and adhesive.
The To Go Class is $40, need it shipped? add $8 for Priority Mail shipping.
Want to order more? A Stamparatus or some ink pads maybe? Spend $50 or more (remember to order your stamp set!) with HOST CODE GZXYAH2Y in my online store and your To Go Class Kit is FREE (stamp set not included). Just pay the $8 shipping if needed.
Ever thought about being a Stampin' Up demo? It's a great time to join the team! Join by 8/31 and get an extra $30 of product! See my website, audramonk.stampinup.net, and click Join The Fun on the right hand side for all the details. Or contact me for more info.
I hope I've inspired you to create something fun for your house or to give as a gift.
If you have any questions, ask away, I am so very happy to help.
So, I've got my first pre-order with the new 2019 Holiday catalog (did you see my unboxing video? I'll put it at the end of this post) and I'm starting to play a bit. I had a team meeting coming up so I thought we should make a fun project. After a little looking around, I saw a cute traveler's style notebook from Pootles, so I decided to give it a try. And then I decided it should be a different size, so I worked that out, and here you go, a holiday list book perfect for carrying in your purse and keeping your holiday purchases organized.
Isn't it adorable? I used the Let It Snow Suite.
You need one piece of DSP, or 2 halves if you want more variety.
Outer piece: 6 x 12, score at 3 on long side and 4 on short side
Inner piece: 5 3/4 x 12, score at 2 7/8 on long side and 4 on short side
Whisper White for stamping, 2 1/2 x 3 1/4
Real Red for backing the stamped piece, 2 5/8 x 3 3/8
Whisper White for list making (4) 2 3/4 x 7 3/4
Here's the video with all the info.
I think they would make great gifts for busy moms and grandmas, ok and dads too although they may not have purses to carry them in. Here are a few more pics to help you out.
It's a great time to join my Stampin' Up team. Until August 31, get an extra $30 in free product and a $10 coupon to use in September. Want more info? Contact me! audramonk@yahoo.com
I'm here to help with your crafting. If you have a product you want me to feature, let me know.
Today I have a very fun bundle to share with you with a video tutorial. When I first got the 2019-2020 Annual catalog, I was drawn to the super cute little box made with the Perfect Parcels dies.
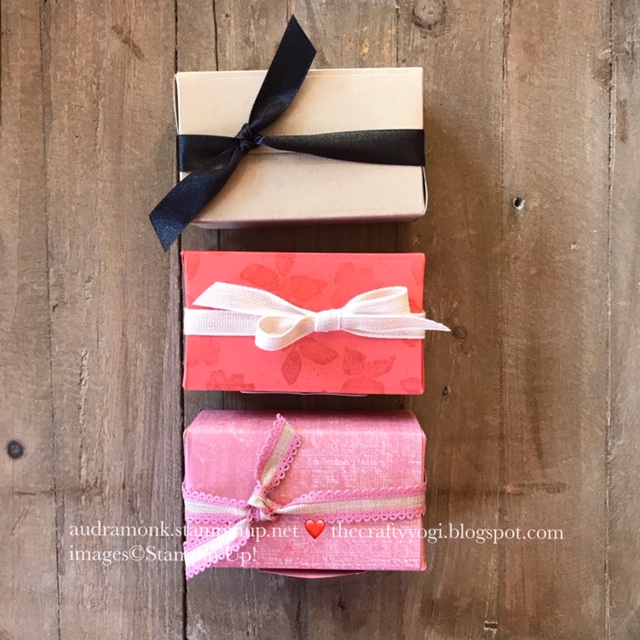
I made a few of the boxes in a variety of colors.
The boxes are the perfect size for gifting a gift card, money, treats, and other small gifts.
Check out my how to video for all the tips and tricks to assemble your boxes.
Here are some close up pics:
This bundle, #151107 is available at a 10% discount (over purchasing the stamp set and dies separately) in my online store, audramonk.stampinup.net, click shop.
Want to get your products at a discount with extra free stuff? Join my team! audramonk.stampinup.net, click join.
It's time for the ICS Blog Hop. This month we are sharing projects made with a bundle. Stampin' Up has the best coordination, which makes crafting so much fun!
I had such a good time playing with the Dinoroar bundle last week in my final It's All About the DSP tutorial that I had to keep the fun going. This bundle is so cute.
I kept thinking that I had to use this bundle for a baby card. One of the sentiments says "look who's hatched" and there's a cute little cracked egg. So, that's what I did!
We'll be making this cutie in my Just Cards class coming up on August 21. Usually we make 2 of each card design in class, but I decided this time we should make a set. So I made a quick and simple card using some DSP and the apatosaurus (I think that's what it's called).
Did you notice the lovely Mosaic 3D Embossing folder?
Goodness, this bundle is just so cute! This is a great set of cards to have at hand.
Thanks so much for stoping by my blog today. For more inspiration using SU's beautiful bundles, click HERE or the next button below to see what Darla has to share. And from there you can keep on hopping! I've shared the full class offering for the 21st at the bottom of this post.
Live near Frederick, MD? Join me for an in studio class! For our Just Cards classes, we make 6 cards, usually 2 each of 3 cards. There are some options on the sentiments when possible so you can make the cards you need. I prep all the supplies and you get to have a fun time stamping and assembling the cards while meeting new friends. Interested in joining us? Let me know, audramonk@yahoo.com.
Shop for Stampin' Up's beautiful bundles and all of their great products in my online store: audramonk.stampinup.net.
This is the last post in my three part series about DSP. As you may already know, I love Stampin' Up Designer Series Paper. In my opinion, it's the best ever! For my final post, I decided to make a Sunburst card. They are a bit messy, but lots of fun. I used the Dinoroar Suite, it is so cute.
Gah! I just love them all!! I'll give a few measurements, but watch the video posted at the bottom of this post for lots of helpful tips.
For all the projects, the DSP is cut to 1 1/2" x 4" and then cut into triangles.
I attached the DSP triangles to a 2 3/4" x 5" piece of Lovely Lipstick card stock. I left small even spaces between the triangles. Then I backed that with Old Olive card stock cut to 2 7/8" x 5 1/8". The card front is the standard 4" x 5 1/4". I embossed it with the Mosaic 3D folder.
This one is pretty similar, but I butted the triangles right up to each other, and then cut down the DSP piece to be 1/4" smaller than the background piece.
On this card, the Pineapple Punch card stock piece is 3" x 3". Then backed by a Pretty Peacock piece 3 1/8" x 3 1/8". I think this is such a fun card.
I'm planning to give it to my husband next week for our anniversary.
Here is the video tutorial. (Don't mind my stuckness at the end when I couldn't get my dimensionals to work properly!)
Want to get lots of free products? Join my team! Until August 31, SU has a bonus offer of an extra $30 of free product in your starter kit. Then you can get all your products at a discount! Ask me for more details.
Happy Summer! We are in full summer mode here on the east coast. I am in fact enjoying a beach vacation the very moment I'm writing this. And thinking about said vacation is what inspired me for one of my alternative projects, but I'm getting ahead of myself, let's start at the beginning.
It's time for a super fun blog hop with the Paper Pumpkin Thing crew.
July's Paper Pumpkin kit is called On My Mind and it features three different sets of cards that coordinate with three different suites in the annual catalog.
It is such a nice kit! Great for all levels of stampers. For a closer look, check out this video:
I was definitely in a summer beach vacation mind set when I made this project for the blog hop. I made my own Memories and More cards! I am a scrapbooker. But not the super fancy type. I like pages that can go together quickly. And I love Stampin' Up's pocket pages and Memories and More cards. So I opened up the Come Sail Away card pack and then just started playing with the cards and stickers and with the Paper Pumpkin supplies.
I know that I am going to enjoy using these cards when I get home from our trip.
These cards and the ones in the pack will be fun to use scrapbooking pics like this one from our beach vacation.
This is a selfie of my husband and I with our three adult kids in the ocean in the background.
My card alternative really has nothing to do with the beach, so it would be great to send to anyone celebrating a birthday.
Everything is from the PP kit except the card base, which is a piece of Night of Navy card stock.
I hope that I've inspired you a bit for alternative uses for your July kit.
For more inspiration, click on the names below.
Not a Paper Pumpkin subscriber yet? Go to paperpumpkin.com to join the fun and if you don't already have a demonstrator, choose me at check out. Next month's kit has a fall theme with gift bags and tags and there is an optional card making add on bundle (for just $10!) that you can purchase in my store, audramonk.stampinup.net starting August 1. But you must be a subscriber to do so! Have questions? Email me, audramonk@yahoo.com.