Ahh...Fall, I love it! The cooler temperatures, the changing colors of the leaves, the back to school energy. Fall on the east coast is a truly lovely thing. And celebrating it with my paper crafting supplies makes it even better.
That's one of the great fun things about paper crafting, you can celebrate the seasons, any time! I mean, my last post was about Christmas cards (super fun!) and now I'm talking about Fall. And tomorrow, I might celebrate Summer...it's all good!
My Sampler Framed Art classes are going well. We meet once a month, usually the last Wednesday of the month to make the sampler for the next month. So, they're somewhat related to the upcoming month's season. Love a sampler a lot? Hang it or display it year round, that's what I'm going to do with my nautical one, I think it's going in the bathroom.
Like change? Just swap out the sampler for a different one!
May I present to you....Fall!
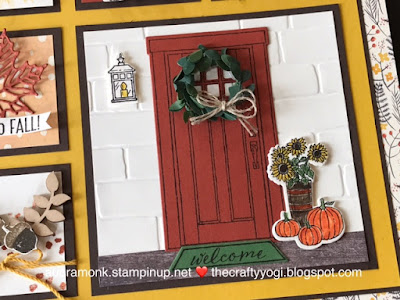
Isn't it lovely? We're using the 9 x 9 Ribba shadow box frames from Ikea. They're $10 US. The shadow box feature allows the design of the sampler to have 3D elements, like the Boxwood Wreath (144176) on the door. It also allows for lots of Stampin' Deminsionals! I've used lots of new products from the new Holiday Catalog. Catalogs available for shopping on September 1 (and for Demos now!). Need a catalog or want to join my team, just ask.
The Hello Fall square uses the leaf die from the Seasonal Layers Thinlits, (seriously, you must buy this set!) the sentiment is from the Merry Cafe set, I've snipped it out a part of it. The knotty bit is three strands pulled from our Burlap Ribbon, tied in a knot and attached with a glue dot. The Designer Series Paper for the whole project is called Painted Autumn and it is amazing! The acorns are from the Painted Harvest stamp set, I fussy cut them out. I also used the Touches of Nature Elements and our Crushed Curry Baker's Twine.
Here we have stamps and dies from the At Home With You Bundle. And a little tiny strip of our Wood Textures DSP for the floor.
I've die cut (Large Letters Framelits) out the letter from the DSP that is used for the base layer. I attached the DSP M (use you initial of course) to another M die cut out of a piece of thin chip board that comes in the DSP packs. That just added dimension, and I used Dimensionals too.
The sunflower square might be my favorite! It's from the Painted Harvest stamp set with the coordinating Leaf Punch. I used Crushed Curry ink, stamped off once for the first layer and then full strength for the second layer. And Early Espresso for the center of the flower. The leaves are done the same way in Garden Green and punched out with the Leaf Punch.
I've used several layouts for the samplers. This is the 5th one we've done in class (I've used this basic layout on two of the previous samplers). You can see earlier blog posts for information on the others. This sampler's basic layout measurements are:
9" x 9" DSP base (I actually cut out the center of this piece to use for later).
8 1/8" x 8 1/8' Early Espresso
8" x 8" Crushed Curry
The Very Vanilla and DSP squares are 2" x 2" and the big square is 4 1/2" x 4 1/2"
Early Espresso 2 1/4" x 2 1/4" and 4 3/4" x 4 3/4" backs the "working" pieces
Here's a picture of the sampler with no frame.
And here it is sitting pretty on my sideboard.
The class costs $30 with the frame and $20 for no frame. Class on the 23rd is full, but I can add your name to the wait list or if there's enough interest, I can add another class.
I can also do a Private Class if you'd like to make this with your friends and family.
This can be done at your place or mine.
As always, I am here to help you with your crafty needs!
Stay Crafty!
Audra
Contact me by email: audramonk@yahoo.com
Follow me on Facebook: The Crafty Yogi


No comments:
Post a Comment