Saturday, March 2, 2019

March 2019 Class to Go, Happiness Blooms

Hi Crafty Friends!
You are going to love this month's Class to Go! 
It features the Happiness Blooms Suite from our Occasions catalog. 


While the suite of products is great, the project is awesome. We'll be making six notecards (two each of three designs) with the coolest storage envelope ever (no adhesive needed!).
Recommended stamp pads: Night of Navy, Calypso Coral, Lovely Lipstick, and Pineapple Punch. I'd also recommend the Pick Up Tool.


Super cute! This would make a great gift, (think Easter basket for your tweens and up or Mother's Day) or it's the perfect fun thing to keep and use for yourself.

Let's go over the class options and for a closer look, please check out the video at the bottom of this post. All rsvp's with payment are due by March 11. Then I'll order the supplies and prep the kits. They should be ready for pick up or posting by March 27th.

Option 1

The full deal! The Bloom by Bloom bundle, (Bloom by Bloom stamp set and Bitty Blooms Punch Pack) a roll of the Calypso Coral 3/8" Satin Ribbon, the Happiness Blooms Enamel Dots, and one Classic Stampin' Pad (your choice of color). The project kit, supplies pre-cut for six notecards (due to the small size of the punched elements, you will receive pieces of card stock to punch them out yourself), and the storage envelope will be scored and ready to assemble. A PDF with measurements and instructions as well as a link to a private video tutorial.
$70 (plus shipping if needed) this order will qualify you for one free SAB item.

Option 2

Have the bundle and embellishments already? Just order the project kit and PDF/video tutorial.
$25 (plus shipping if needed)

Option 3

Have all the things and just need the info? This is the option for you! PDF and video tutorial only.
$15

Option 4

On my team? You get a discount! You'll order the supplies yourself and I'll prep the project kit. Plus you'll get the PDF/video tutorial. Just need the info? That's free!
$20 (plus shipping if needed)

RSVP by March 11, email me at audramonk@yahoo.com to order.


And, as promised, here's your video!


Questions or comments? Let me know.
Stay Crafty!
Audra


Thursday, February 21, 2019

Early Spring Sampler

Hi Crafty Friends!
We've just had another snow event and I'm dreaming of spring. I mean, I like a snow day as well as the next person, but I think I'm done with winter now. I had a good time crafting a little bit of Spring with this month's framed art sampler.


I decided to create out of the boxes for this sampler. And I was very much inspired by this card we made at the Maryland Stampers event.


Here are the measurements for the sampler:

Whisper White project base, 9" x 9"
Balmy Blue, 8 1/2" x 8 1/2"
Berry Burst,  8 1/4" x 8 1/4"
Long rectangle: Whisper White, 2" x 7", Balmy Blue, 2 1/8" x 7 1/8", and Crushed Curry, 2 1/4" x 7 1/4"
The medium rectangles are from our Rectangle Stitched Framelits Dies, I used the 3 3/4" long rectangle. It's die cut out of Balmy Blue card stock. Whisper White, 2 1/2" x 3 7/8", and Crushed Curry, 2 5/8" x 4"

I had such a good time putting this all together. I had lots of fun with layers. 
Let's take a closer look at the different elements.

This corner is a celebration of the Stitched Labels Framelits Dies. The sentiment is from the Amazing Life stamp set, as is the little four leaf clover, which I stamped in Momento ink and colored with Old Olive Stampin' Blends. You'll need to fussy cut out the clover.

The little wood flower is from the free SAB Butterfly elements, witch are unfortunately now out of stock. If there are SAB items you are really wanting, I'd place your order now! The project will still look lovely without the wood elements, or perhaps you have some left over from a previous purchase.


I love this middle panel full of four leaf clovers! I even stamped, colored, and cut out two of them to pop up and bring a little more dimension to this panel.


These Butterfly Gala butterflies are so fun (and fingers crossed that the punch will be back in stock soon). To give them lots of dimension, there is a second set of butterflies with dimensionals in between each layer. I added some Silver Thread and Rhinestones. Did you notice the stitched stamped lines in the background? I used them in the other medium rectangle element too.


This element features the Needle & Thread bundle. I used the Stamparatus with the hinge technique to get the back ground lines stamped so nicely.

This last element uses the Foliage Frame Framelits. I used Old Olive and Mossy Meadow card stock. The sentiment is from the Colorful Seasons stamp set.

Look at those layers! Aren't they lovely??

I am super excited to share this project in class next week. Rsvp by Monday the 25th to join the fun. These framed art pieces are great for around the house or as gifts. 
Also available as a finished project or as a To Go kit (no stamped images). Contact me at audramonk@yahoo.com for more info.


Wednesday, February 13, 2019

Maryland Stampers Weekend

Hi Crafty Friends!

I had such a good time last weekend, I want to share it with you. 
I attended the 6th bi-annual Maryland Stampers event and did the full weekend option. The Maryland Stampers is a group of demonstrators that get together to share what we love. 
Which is Stampin' Up! of course! 
It's run by four very lovely ladies. They offer events for demos to meet and craft (and eat!) together. So this past weekend, I decided to treat myself to the full deal.


The event this time was held at the Solomons Navy Recreation Center. Usually it's a one day event held at a local community college (I say usually, but I'm not an expert! This was my third time attending.) but this time it was held at Solomons Island and there was the option for the full weekend.
It was cold and windy, but very nice. I arrived about 5:30 and got to enjoy the sunset. We then enjoyed some lovely snacks and a bit of crafting.


I learned some great card techniques! 
So don't be surprised if you see similar layouts in future classes.

The next day was full of crafting, first at the main event and then back at the cottage after dinner. An extra cool thing was that Tanner Smeadly, our DDM (I think that stands for District Demo Manager) came from the home office in Salt Lake City to share the day.

Great swag bags! And table gifts! And Prize Patrols.

Super cute make and takes.

A wow project.

This was my first time making a pop up box. Very cool! I learned some new techniques and had a great time chatting with the other demos and Tanner.

After a great dinner (and lots of yummy cookies) we had a shoebox swap. This is where each person designs a card and then brings all the supplies ready to stamp an assemble. 
Here are some of the projects we made.


This is the card I designed using some lovely new product available 2/15 and 3/1.


And here I am with the super awesome Maryland Stampers crew and Tanner. Lots of thanks and love to Tricia, Margaret, Terese, and Sandy for a great weekend and their friendship.

And that wraps up my report on my crafty weekend. These demonstrator events are so fun! 

You should totally think about joining my team and making new crafty friends. It's the best time ever to join! During Sale-A-Bration, you get 175 dollars of product for $99 with free shipping. I am here to answer any questions and help you on your Stampin' Up journey.

Stay Crafty!
Audra


Friday, February 8, 2019

2019 Scrapbook Class, Part 1

Hi Crafty Friends!

I am so excited to share my passion for scrapbooking with you. Let's start with two things, we need to free our pictures from our phones, and scrapbooking does not have to be hard or complicated.

I love taking pictures and scrapbooking was my first foray into paper crafts. 
This video kind of sums things up for me:


So you can see,  this whole free your pictures thing is really important to me. I love being able to take great pictures with my phone, but I've seen how the whole connivence of it is preventing lots and lots of us from having actual pictures we can look at and share.

My plan is to share my memory keeping process with you through several blog posts and videos. My hope is that my ideas will help you free your pics and give you a scrapbook to be proud of.

I am offering this as an in person class at my home, every other month through December and at the end of the year, your 2019 book will be done. Wow! Won't that be totally awesome?
Here is a quick video flip through and general ideas for getting started. After the video will be pictures of the first class offering with pricing info.


Let's take a closer look at the page layouts.
 I had such a fun time getting back onto traditional scrapbooking!


This is our cover page. This page uses the free SAB Botanical Butterfly DSP. The numbers are retired.


January's layout uses the Winter Woods stamp set and coordinating dies (they carried over from the Holiday catalog). Close up pics of each page follow.


The Letters for You and coordinating Large Letters dies will be the constant for each monthly two page spread. Next up is February. Get all the details from this blog post: Feb layout.


Each class will have an optional birthday or sometimes seasonal page. 


I used the Broadway Bound Suite for this page.


The in person class is coming up on Sunday February 24th at 1:30. RSVP by Feb 18. The class is $45, which includes all supplies and page protectors. The birthday page is an additional $7. If you order the Black Faux Leather Album from me, I'll take $5 off your class fee. This class is also available To Go (no stamped images) or as a completed project. Contact me for more info.

Free your pictures and stay crafty!
Audra


Wednesday, February 6, 2019

A Sweet Scrapbook Idea, ICS Blog Hop

Hi Crafty Friends!
It's the first Wednesday of the month and I'm sharing inspiration with the ICS Blog Hop Team. We're sharing all things love. I love Designer Series Paper (DSP) and boy do I love the All My Love DSP from our Occasions catalog. Today I'm sharing how I'm using this paper for my 2019 Scrapbook.


I've decided one of the important projects in 2019 for me, is to help you with your memory keeping. I'm planning a bunch of blog posts and videos with lots of different ways for scrapbooking. And we're just getting started with this post. I am offering an every other month Scrapbooking Class where we'll create 2 monthly two page spreads. 
And the one I'm sharing today is probably going to be one of my favorites!


I mean, how can you not love this paper? Crumb Cake, Flirty Flamingo and, Lovely Lipstick (doesn't Stampin' Up have the best color names?) are the featured colors. 
I decided for this layout to let the paper be the star of the show.


I've also used a few of our dies.


Our Letters For You stamp set with coordinating Large Letters dies is a big investment, but one that will earn its keep. You'll use them for years!

The Be Mine Stitched Framelits are another set you'll come to time after time. For Valentine's Day as well as weddings, anniversaries, and love projects. Bundle them with the coordinating Meant to Be stamp set and save 10%.

Hoping I've inspired you a bit on scrapbooking or with how awesome the All My Love Suite is.
Looking for more love inspiration? Click HERE or the next button below to see what my good friend Megan has to share.


Need scrapbooking help or inspiration? Check back often as I plan to be sharing lots all month. Want to shop for this great DSP or other items? Check out my store HERE
I'm here to help you with your crafty needs, so contact me anytime.

Stay Crafty!
Audra


Thursday, January 31, 2019

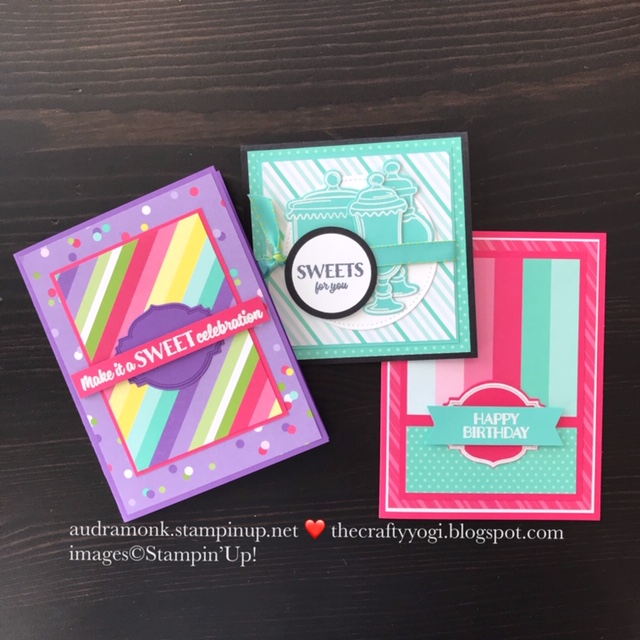
February's Class to Go, Sweetest Thing

Hi Crafty Friends!
I am so very excited to share this month's Class to Go with you. It is the sweetest class ever!


The colors are bright and vibrant, the sentiments are awesome, and the jars are super sweet. The card kits will include all the paper cut and ready for you to stamp and complete your projects. 

Recommended ink pads: Momento Black, Georgous Grape, Versamark, and White Embossing Powder (plus Heat Tool). You will need a Bigshot for this class.
There are several options for the class, so read them closely and then contact me audramonk@yahoo.com to get your payment link. I love helping you get crafty at home. 

Option 1

The full class. The Sweetest Thing bundle, stamp set and framelits, and a roll of the Costal Cabana/Granny Green Ribbon ($61value(w/S&H&tax)). You'll get to pick a free SAB item! 
Card kit to make two each of the three cards. 
Plus I'll add in a free quarter pack of the How Sweet It Is DSP (a half sheet of each).
PDF with measurements and instructions and a link to a private video tutorial.
$71 (plus shipping if needed)

Option 2

The full class PLUS the embossing pack (Versamark Ink Pad, White Embossing Powder, and Heat Tool ($51 value). You'll earn 2 free SAB items!
$113 (with this option, your card kit is free!) (plus shipping if needed)

Option 3

Already have all the supplies?
This option gets you the card kit with the PDF and video tutorial link.
$25 (plus shipping if needed)

Option 4

PDF and video tutorial link.
$15

Option 5

On my team? You'll get the card kit and the PDF, and the video tutorial link.
$20


RSVP with payment due by February 10. Orders will be placed and once received I will prepare the card kits and have them ready for pick up or shipping around the 27th.

RSVP by emailing me at audramonk@yahoo.com.

Have a request for a Class to Go? Let me know!
Stay Crafty!
Audra

Be Mine, A Paper Pumpkin Thing Blog Hop

I'm so glad to be back hopping with the Paper Pumpkin Thing Crew!


I love this month's kit! However, as an empty nester, I don't really need 24 treat boxes. But I'm an Auntie who likes to send cards to all the littles in the family, so I'm planning to make lots of cards to send them for Valentine's Day. 


Isn't this super cute? I used our Notecards to make this sweet card. I cut down two of the pillow boxes so that I could use them just like DSP. I did take the few extra minutes so that I could die cut out the four small squares with our Stitched Shapes Framelits. I cut apart the little chameleons so that I could place them in different squares. I think that all my nieces and nephews will really like these cards.

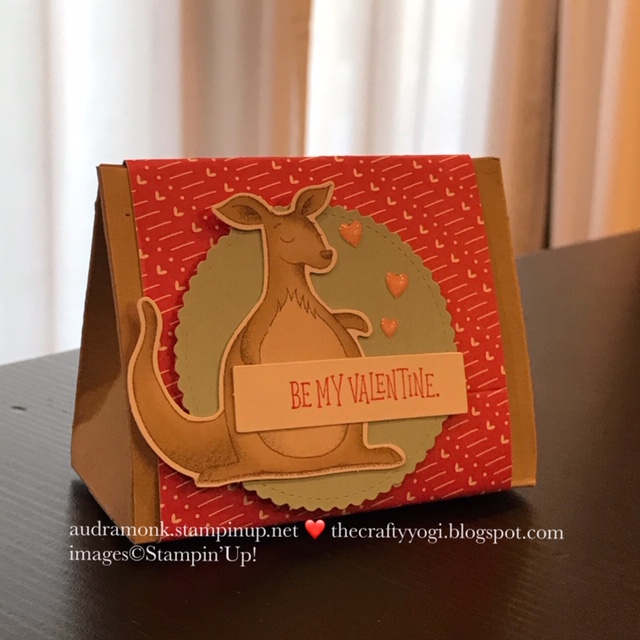
As an empty nesting mom, I do like to send my adult children care packages. My youngest is a sophomore in college, and he really likes getting the email that means he has a package. Pretty much every package involves candy. So I though I should make a bigger treat box to include in his care package. I saw a cute little box posted recently from my most excellent crafting friend Michelle Suit, who got the idea from UK crafter Sam Hammond (Pootles). So I decided to give it a try.


Sam calls it a tent box. It's a tented box bottom with a slide on cover. I used Crumb Cake for the base and two of the kit boxes cut down and attached together for the slider top.


This piece is 3" x 8". Once you attach the pieces, you'll need to cut some off one side to bring the piece to 8". The base is a piece of card stock 4" x 11" scored on the long side at 3 1/2", 5 1/4", 8 3/4", 10 1/2". You'll need two pencil tick marks at 4 3/8" and 9 5/8". Score the short side at 2 3/4".
You can see Sam's tutorial and video HERE.

I hope that you enjoyed my alternate projects.


And I hope that you love the fun and variety of our Paper Pumpkin kits.
Want to join the fun? Go to paperpumpkin.com to sign up, and if you don't already have a demonstrator, I'd love for you to choose me.
Stay Crafty!
You can see more ideas by clicking the names below.