Sunday, December 31, 2017

Winter Snow Framed Art Sampler

Greetings Crafty Friends!

I'm writing this blog post on the cusp of the new year. It's about 9:30 on New Year's Eve. I'm nestled in on the couch under a warm blanket (it's been 30 degrees or below for days) while my sons and husband play a video game together. As a mom of three college/grad school kids, the winter break has become one of my favorite times of the year. 
And now we'll celebrate the fun stuff of winter with January's framed art sampler.


The sampler is in a 9" x 9" shadow box frame. I usually buy them from Ikea or Michael's.

Here are all the measurements:
9" x 9" Whisper White
8" x 8" Night of Navy
Top panel: 2 1/4" x 7 1/4" Marina Mist & 2" x 7" Whisper White
4 squares: 2 1/4" x 2 1/4" Whisper White & 2" x 2" Marina Mist
Bottom right panel: 2 1/4" x 4 3/4" Whisper White & 2" x 4 1/2" Marina Mist


Let's take a closer look and I'll share the stamp sets I used. I used pretty much every snowflake stamp I own. Some are retiring and only available through Jan 2, 2018, so if there's one you like, order it quick! But, you can really use whatever snow flakes you have.


The Night of Navy base is stamped with the snowflakes from Christmas Pines stamp set (Annual Catalog) in Whisper White Craft Stampin' Ink. The Whisper White background is stamped with the two small snowflakes from the Merry Cafe (Holiday Catalog, retiring) set in Marina Mist ink. The letters are stamped with the snowflakes from Snowflake Sentiments (HC, carrying over). They are die cut with our Large Letters Dies. The circle behind the mittens is die cut with the Stitched Shape Framelits and stamped in Whisper White with the Snowflake Sentiments stamps. The mittens are stamped in Early Espresso ink with the Smitten Mittens set (HC, retiring) and die cut with the Merry Mittens Framelits, they are "attached" with 3 1/2" of Linen Thread.

Another idea/option is using the Cat Punch (HC, carrying over).


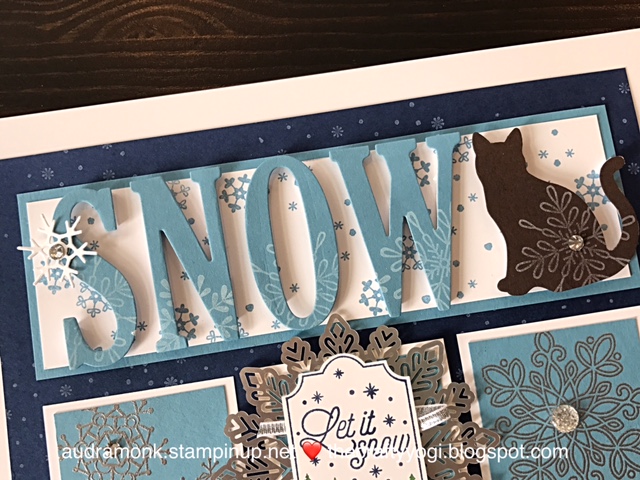
This center panel features the stamp from Merry Little Labels (HC, retiring). I colored it with my Stampin' Write Markers, Garden Green, Early Espresso, and Night of Navy. It's punched with the coordinating Every Day Label Punch (HC, carrying over). Backed with 7" of Silver 1/8" ribbon (AC). And then backed by one of my most favorite embellishments, a Foil Snowflake (HC, retiring).


The two side panels feature silver embossed snowflakes. The left from the Colorful Seasons set (AC) with a Rhinestone in the center. The right panel is the medium sized snowflake from the Flurry of Wishes set (AC) with a Faceted Gem at the center.


The bottom left corner is the small cup from the Coffee Cafe set (AC) cut out with the Coffee Cup Dies. And embellished with a snowflake from the Seasonal Layers Thinlits and a rhinestone. There's some Wink of Stella on the whipped cream.


To make this right lower panel, start with a piece of Whisper White card stock cut to 2" x 4 1/2". Die cut it with one of the rows of houses from the Hometown Greetings Edgelits (HC, carrying over). The background is stamped with the Christmas Pines snowflakes.

Whew! I'm hoping I covered everything. Any questions, let me know. I'm going to enjoy having this on my cabinet all month.


Happy Creating! 
If ordering online (audramonk.stampinup.net) please use host code, JWMWNHGK.
Stay Crafty!
Audra


Wednesday, December 6, 2017

ICS Blog Hop - Quilted Christmas 6x6 DSP

HI Crafty Friends!
Welcome to the first Wednesday of the month, and the ICS blog hop. This month we're making it a December to remember.


I'm sharing projects made with the Quilted Christmas 6x6 DSP. I'm hosting a team meeting tonight and we are going to have a white elephant gift exchange and I wanted to make a little framed art piece for my gift. If you've been following me on Facebook or Instagram, you might have noticed I'm on a framed art kick. Anyhow, let's take a look.


I am so happy with this project! Can't you picture it on your mantle or hanging in the hallway.
This is a 6x6 frame I bought at Michael's (they've been having some great sales). 

The quilt squares are die cut with the smallest square Stitched Shapes framelits. They are mounted with Stampin' Deminsionals on a piece of Pool Party card stock, 4" x 4". Then attached with Fast Fuse to Whisper White, 4 1/4" x 4 1/4". Then attached with Deminsionals to Whisper White, 6" x 6". 


The circle is die cut from the Stitched Shapes framelits. The little tree is one of out Stitched Felt Embellishments, if you don't have these yet, you should order them, they are so wonderful. I made the tree trunk by cutting one of the Corrugated Elements tags in half. I attached the tree with Demensionals and topped it with a double bow made from Linen Thread attached with a Mini Gluedot. I may have done a little happy dance as the whole thing came together.


Next, I want to show you a project that uses the same paper and basic design, but it's not Christmasy.  We'll be making this card in my Just Cards classes this month.


This card features a Real Red card base, topped with Whisper White, 4" x 5 1/4", and Pool Party, 3 7/8" x 5 1/8". The "quilt" is four die cuts from the small Stitched Shapes framelits, mounted on a 3" x 3" piece of Pool Party card stock and then Whisper White, 3 1/4" x 3 1/4".

I stamped the Pool Party layer in Pool Party ink with the pattern stamp from the Musical Season stamp set. The greeting is from the new Fruit Basket stamp set, available January 3 in our new Occasions catalog. And the star is from the Wood Crate framelits dies.

I'm pretty sure you could make this a Christmas card too.

Thank you so much for checking out my blog post. If you need help or more info on any of the products used here, just let me know.

For more inspiration, take a look at what Joni has to share. Click HERE or the arrow below.


Stay Crafty!
Audra


Thursday, November 30, 2017

A Paper Pumpkin Thing Blog Hop, Back in Plaid

Hi Crafty Friends!
It's time for a Paper Pumpkin Thing blog hop! And I'm betting this one is gonna be awesome. The kit is amazing just how it comes so I'm sure the alternate ideas will be even more amazing!


For my projects with the November Paper Pumpkin kit, I made a card and a shadow box.


Let's talk a little bit about the shadow box. The kit comes with 10 little stockings. You need to turn them right side out. I did this and then used the rounded end of my bone folder to get down into the toe and smooth out the edges. Then to get the stocking flat, you can run it through your big shot with all the plates (like a framelit) or even better, run it through in an embossing folder. I used the Cable Knit 3D Dynamic Textured Impressions embossing folder. I spritzed the stocking with water first.


Then I decorated it pretty much as described in the kit. I mounted it with mini glue dots to a piece of Cherry Cobbler cardstock backed with Old Olive card stock and then to a piece of our Merry Music DSP (then to an extra piece of cardstock for stability). And the whole thing is put into an Ikea Ribba 9" x 9" frame.


I think it will make a great Christmas holiday decoration. 
My card complements the frame perfectly. The set would make a great gift.


I used the Cable Knit embossing folder on the card front. The Cherry Cobbler banners and Old Olive leaves are from the kit, as are the stamps.

Want to order supplies or join in on future Paper Pumpkin fun? Click HERE to go to my online store. Or contact me for more details.

For more inspiration, click HERE or the next button below to see what Rick has to share.

Thanks so much for stopping by! I'd love for you to subscribe.
Stay Crafty!
Audra


Wednesday, November 29, 2017

ICS Bloghop - Join the Fold -Celebration Time

Welcome to a special Inspire, Create, and Share blog hop! 


We recently attended the On Stage event in Salt Lake City with 2,700 demonstrators to see new products, hear training, and connect with friends. Our team met for dinner and to swap cards designed with fancy folds. Meeting together is the best and of course, we want to share the fancy fold card designs with you! 
I used the Celebration Time stamp set, the Oh So Lovely DSP and our new Stampin' Blends for my project. Video tutorial included in this post!


It looks like a regular card, but give the sides a little pull and huzzah, out comes a cute little pop-up element!


This was a new idea to me. In fact, the card that inspired me was made by a French Demo named Aude Barbara. Luckily her video had US measurements as it was in French. And the video was pretty easy to follow. You can find her post HERE
But if you'd like to check out my video, it's right here.


Measurements for card:
Card base, 2@ 4 1/4" x 8 1/2" score at 1 1/2" and 3"
Pop-up piece, 1 1/2" x 3" diagonal score at 1 1/2"

Being a demonstrator means you meet people from all over the world, get to travel for events, and we get the first peek at new products. Only demonstrators get the opportunity to attend Stampin’ Up! events to see the new catalog in hand, use the products, and the perk of bringing home new stamp sets, projects, and sometimes more! You can join one of our teams and receive all of these demonstrator perks. You select your starter kit, it is $125 in product but you only pay $99 and includes free shipping. Just ask your demonstrator where to get started to sign up OR if that is me CLICK HERE!

It was a super fun time at the On Stage event in Salt Lake City. I had only met one of the other ICS hoppers before and it was great to meet so many others in person! 


Want to see more fancy cuts and fun folds?
 Click HERE or the arrow below to see what Darla has to share.


Thanks so much for stopping by.
Stay Crafty!


Sunday, November 26, 2017

Easel Calendar Card

Hi Crafty Friends!
Today I'm sharing a quick post with video on how to make an easel card. In this case, it's an easel card with a calendar and post it notes. They are quick and easy to make and make great gifts.


This one uses retired DSP, but any of our lovely DSPs would work. I purchased my calendars from taylored expressions, here's the link: mini calendars.

Measurements:
4 1/4" x 11" card base
4 1/4" x 5 1/2" also card base
4" x 5 1/4" DSP - need 2
2 1/2" x 3 1/4" cardstock piece to back the calendar

Now you're ready, so here's the video tutorial.


Or click HERE to watch the video on YouTube. I'd love it if you'd go to my channel and subscribe.

As always, need supplies? Have questions? Just ask!
Stay Crafty!
Audra

Tuesday, November 21, 2017

Christmas Joy Sampler


Hi Crafty Friends!
Thanksgiving is just two days away and in a few hours all my college kids will be home and our nest will be full. And that is my favorite part of the holiday season (ok, to be honest, I have lots of favorite parts). My sampler classes have been a big hit. And I am very excited to share this one with my customers! Isn't it lovely?


There's not a lot of stamping this month, but I'm fine with that (we stamped a lot on last month's sampler).  And my stamps have been getting quite a workout with all the Christmas cards we've been making. This sampler shows off many of the wonderful embellishments in our Annual catalog as well as our Holiday Catalog. Check out my kit to go offer at the bottom of this post

Let's go over the measurements first.

Crumb Cake base, 9" x 9"
Real Red base, 8 1/2" x 8 1/2"
2 - Whisper White, 2 3/4" x 2 3/4"
2- Whisper White, 2 3/4" x 5"
2- Whisper White, 2 1/2" x 2 1/2"
2- Crumb Cake, 2 1/2" x 2 1/2" 
2- Crumb Cake, 2 1/2" x 4 3/4"
2- Crumb Cake, 2 1/4" x 2 1/4"
1- Merry Music Speciality Designer Series Paper, 2 1/4" x 4 1/2"
1- Christmas Around the World DSP, 2 1/4" x 4 1/2"
1- Wood Textures DSP, 2" x 2"
*** disclaimer: the pieces don't go together evenly, and I am not really bothered by it at this moment, but if it bothers you, play a bit with the sizes. I wanted generous squares and rectangles to hold the elements.
Let's take a closer look!


I love, love, love the Stitched Shapes Embellishments, and you can't go wrong with a Linen Thread double bow. I attached the star with Dimensionals and the bow to the star with a Mini Glue Dot.


Here I used the Carols of Christmas stamp. I stamped it twice, once on Crumb Cake and once on Whisper White and then cut it out. I popped up the "on" element with a piece of our Foam Adhesive Strips. And the stamped piece is on top of a Foil Snowflake. The right corner is two of the Green Sprigs. I finally opened my can of Embossing Paste! I spread a little bit on the sprigs and then dipped them in some snow glitter left over from last year, but you could use glitter or just the Embossing Paste. I tied them together with some Linen Thread and added a little bow of the  Quilted Christmas 1/4" ribbon (6 inches) and I used lots of Mini Glue Dots to attach the Sprigs to the paper.


This might be my favorite part! I adore this lamppost from the Christmas Lampost Thinlits Dies. I die cut it from Basic Black and used So Saffron for the "light". It's glued down with the Fine Tip Glue Pen. The light part is popped up on a Dimensional. I attached the Boxwood Wreath with Mini Glue dots, same for the little bow made with the Real Red 1/8" Solid Ribbon. **note: I've moved my wreath down about an inch and it looks a bit better. The "snow" at the base is part of a punched circle with some snow glitter. The DSP is from the Christmas Around the World pack.


Our Merry Music Speciality DSP is the base of this lovely rectangle. Using the Large Letters Framelits, I cut out the word joy from Real Red Cardstock. The French horn is die cut in Gold Foil paper with one of the Musical Instruments Framelits Dies.


The tree square has lots of layers! 5/8" Burlap Ribbon, a piece of the Quilted Christmas 6" x 6" DSP punched out with the Everyday Label Punch, some more Linen Thread, a Gold Foil circle die cut from the Layering Circles Framelits, the little tree is from the Merry Mistletoe stamp set in the Annual catalog, and it's topped with a Metallic Enamel Shapes star. Whew! It's a lot, but the delight's in the details, right? The last square starts with a piece of the Wood Textures DSP. Then add some Gold Thread, and some of the Hearts & Stars Elements.

And there you have it! A whole bunch of Christmas Joy. 
I am offering this sampler as a kit to go from now until December 15 (while supplies last). It's $25, including shipping with no frame and $40 with the frame (choice of white or black). The kit will include everything but the stamped images, and adhesives. Contact me to order! Here in the comments or by email, audramonk@yahoo.com.

Want to order supplies to make your own? audramonk.stampinup.net or contact me! I'm here to help with all your crafty needs.


Here's the project in the black frame.

Stay Crafty!
Audra


Wednesday, November 1, 2017

ICS Blog Hop - Merry Cafe

It's the first Wednesday of the month, so that means it's ICS blog hop time!
And it's all about Fall.


I'm sharing a project featuring the Merry Cafe stamp set.


I'm sure I've said it many times before, but I love this set and the Coffee Cafe bundle from the Annual catalog. This Merry Cafe stamp set is so cool as it has stamps for lots of seasons. Fall, Christmas/winter, and even Valentine's/love.

I used the Painted Autumn DSP and the colors from it, Cajun Craze, Crumb Cake, and Soft Sky. It's a pretty quick card, which can be used for lots of occasions or just as a note card.

This Merry Cafe card is part of my Just Cards classes coming up on November 15 and 17.


We'll be making two each of the three cards and due to the magic of stamps, the greetings can be changed up to meet your needs. Here's a closer look of the other two cards.


I love the Carols of Christmas bundle, and I was happy to give it a go in a non-Christmassy way.

The last card for class features the Hello Lovely DSP and the Sorry for Everything stamp set.


Thanks for checking out my blog today! I hope your filling a bit inspired by Fall. 
To see what Terri has to share, click HERE or the arrow below.


Stay Crafty!


Thursday, October 26, 2017

A Paper Pumpkin Thing Blog Hop, Pining for Plaid

Welcome to A Paper Pumpkin Thing Blog Hop!
I'm so glad you're here!


I love this month's kit, Pining for Plaid! Maybe mostly for the plaid card bases? 
Let's take a look at my card alternate first.


Isn't it fun? I was excited to pair the plaid card base from the kit with the plaid from our Merry Little Christmas DSP. And, the trees pre-printed on the card match the trees from the Carols of Christmas Bundle. I mean hello? The card practically made itself! I added a little Gold Thread behind the greeting and glued the sequins to the pre-printed snowflakes. And voila!

Next up, it's so simple BUT I absolutely love it. Check out this super sweet banner.


I cut one of the card bases into 2 inch strips and then used the Triple Banner Punch to notch one end. The circles are from the ornament pieces from the kit. And the Large Letters Framelits show up and do their amazingly wonderful thing in Cherry Cobbler.

I like the banner so much it's up and hanging on my desk.


And here are the two super sweet projects together.


I hope you have a great time with your kit this month wether you make it up as is or try one of the fun alternative projects from this blog hop. 
Click HERE or the arrow below to see what Dena has to share.


Want to subscribe to Paper Pumpkin? Go to paperpumpkin.com to get started. Don't have a demo? I'd be honored if you chose me.

Stay Crafty!