Thursday, March 29, 2018

Paper Pumpkin Thing, March 2018 Kit

Hi Crafty Friends!
It's the last Thursday of the month and that means it's time for a Paper Pumpkin Thing blog hop.


This month's kit is so pretty. It's all flowers and vintage looking. For my projects, I kept it super simple using just stuff from the kit.

Don't you think this would make a great gift? Let's take a closer look.


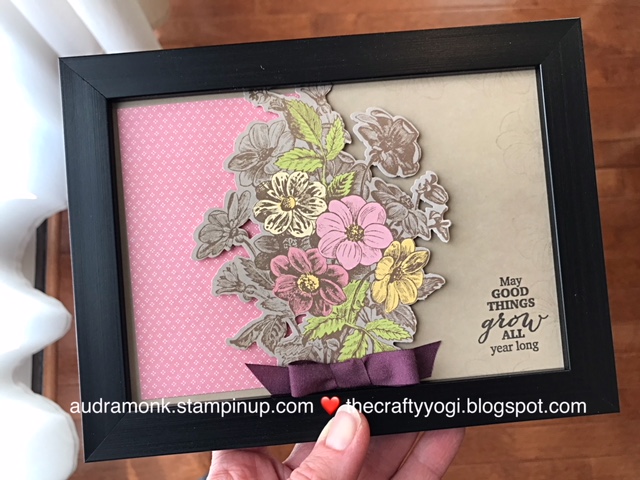
So you might know that I am a fan of some framed paper craft. Yeah, really. This was so fun to make. I used one of the Crumb Cake notecards as the base. I added one of the pink card fronts to one side and then put the flower bouquet die cut out right in the middle (popped up on dimensionals). A bow from the ribbon in the kit and I stamped the sentiment in the corner. Easy Peasy!

For my card, I used the products from the kit, just in a different arrangement.

That's the super fun thing about our Paper Pumpkin kits, you can use them as they come or change them up. 

Thanks so much for stopping by my blog today! Have fun hopping along to see more inspiration.


Want to join the fun? Head on over to paperpumpkin.com and choose me as your demo. And until May 10th, you can save 50% off your first two months. What a great deal!

As always, contact me for more info.
Stay Crafty!


Friday, March 23, 2018

Spring Framed Art Sampler

Hi Crafty Friends!
I am super excited to share this month's framed art sampler project.


Doesn't it just say Spring? Of course it does! But it feels like Spring too. 

Measurements:
9" x 9" Whisper White
8 1/2" x 8 1/2" Pool Party
Squares (2)- 2" x 2" Whisper White, 2 1/4" x 2 1/4" Calypso Coral, 2 3/8" x 2 3/8" Whisper White
Small Rectangles (2)- 2" x 4 1/2" Whisper White, 2 1/4" x 4 3/4" Calypso Coral, 2 3/8" x 4 5/8" Whisper White
Big Rectangle- 2" x 7" Whisper White, 2 1/4" x 7 1/4" Calypso Coral, 2 3/8" x 7 3/8" Whisper White

I was thinking and planning on paper this planner for a few weeks and it all was featured around the word Spring.


I used our Large Letters Framelits and our Petal Garden Designer Series Paper Stack. I used the colors from the paper for the rest of the project. The dots in the background are from the Painted Harvest stamp set. But any small dots would work. 
The Spring element I put in the center of the project.


Let's take a look at the rest of the project.


The top left square features the cute bunny from our Hello Easter stamp set in the Occasions Catalog. The grass is from the Picnic Basket Builder Framelits Dies.


The top right rectangle shows off the cherry blossoms from the must have set Colorful Seasons with coordinating dies. Seriously, if you don't own this set, we need to talk! 


I love this Bike Ride set with coordinating dies from the Annual Catalog. I used it in the same spot on the July/USA sampler last year (click here to have a look)


This bottom corner shows of the lovely big basket and flowers from the Picnic with You set and coordinating dies from the Occasions catalog.

And that's it! 5 great elements that would each be great on a card or small project and work wonderfully together on a framed art piece that you can show off for several months.


I frame mine up in 9" x 9" shadow box frames from Michael's or Ikea.

In closing, in a twist of irony, I put this project together on the first full day of Spring, and this is what was going on outside:


Yes, a Spring snow storm!!

Thanks so much for stopping by my blog today. If you need more info on any of the products used let me know.
Stay Crafty!


Sunday, March 18, 2018

Waterfront Series #4. A Simple Beach Scene

Hi Crafty Friends!

Today's post is a quick and simple beach scene using the Waterfront stamp set.


I love the joyful happiness of this card. And it's super easy to make. Check out this tutorial video:


Supplies and measurements:

Calypso Coral card stock (122925) 5 1/2" x 8 1/2" folded in half
Whisper White card stock (100730) 4" x 5 1/4"
Pool Party card stock (122924) die cut with scalloped circle framelit from the Layering Circles Framelits(141705)
Whisper White card stock (100730) 3 1/2" x 3 1/2" then cut with largest of Stitched Shapes Framelits (145372) My favorite!!
Calypso Coral ribbon from the free sale-a-bration set, 4"

Here's a look at all of the cards in this series:

Want to purchase a kit?
Kits include the paper supplies and embellishments, all cut and ready to use.
Kit with no stamp set, $16 mailed. $12 picked up.
Kit with Waterfront stamp set. $33 sent Priority Mail, $25 picked up.

Orders for kits with stamp set accepted until March 25. Additional ordering period will be added by request. Contact me for more info, audramonk@yahoo.com.

Ordering online, head to my website and click shop. 
Please use host code 6QEHHC2Z through March 25. 

Want to get all these great crafting supplies at a discount? And until March 31, 2018 an additional two free stamp sets! Join my team! It's a great deal. Go here and click join.

Questions, need help with anything? Just ask!
Stay Crafty!

Audra


Saturday, March 17, 2018

Waterfront Series #3. City Skyline at Sunset

Hi Crafty Friends!

Today's Waterfront project is a city scene!


Isn't this cool? I don't ever think I would have thought to make such a thing, which makes me so grateful that crafters are sharing people. I saw a similar project in a demo group. A demonstrator named Kim Jolley posted a few samples using part of the Waterfront stamp set to create a city scene. I checked out her blog, but I couldn't find a tutorial or video, so I started playing around and boy am I happy with the results.

This card has two main parts, the watercolor background and then the city skyline and I explain and demo them in the following tutorial video:


Measurements and supplies needed:

Basic Black card stock (121045) 5 1/2" x 8 1/2"
Whisper White card stock(100730) 4" x 5 1/4"
Basic Black card stock (121045) 3" x 4"
Water Color paper (122959)
Whisper White (100730) 1/2" x 5 1/4"
Aqua Painter (103954)
Stampin' Spritzer (126185)
Momento Black ink pad (132708)


E Block (118484)
Stampin' Write Markers
Perfect Plum
Fresh Fig
Berry Burst
Daffodil Delight
Real Red

I think my marker selection was slightly different from the sample and the video, but it really doesn't matter. Choose whatever colors seem to match your picture or imagination.

It's really crazy to think that you can make the whole scene with one stamp.


Here's a look at all the cards in this series:


Want to purchase a kit?

Kits include the paper supplies and embellishments, all cut and ready to use.

Kit with no stamp set, $16 mailed. $12 picked up.

Kit with Waterfront stamp set. $33 sent Priority Mail, $25 picked up.
Orders for kits with stamp set accepted until March 25. Additional ordering period will be added by request. Contact me for more info, audramonk@yahoo.com.

Ordering online, head to my website and click shop. 
Please use host code 6QEHHC2Z through March 25. 


Want to get all these great crafting supplies at a discount? And until March 31, 2018 an additional two free stamp sets! Join my team! It's a great deal. Go here and click join.

Questions, need help with anything? Just ask!
Stay Crafty!
Audra


Friday, March 16, 2018

Waterfront Series, #2. A Mountain Painting

Hi Crafty Friends!

Welcome to the second in a series featuring the super versatile and totally awesome Waterfront stamp set from Stampin' Up. Today, we're "painting" a mountain scene. I was inspired to make this card after watching a video by Linda Dalke, a Canadian demo. (My card looks a lot like hers.)


Isn't it lovely? It's so cool how it comes together. So don't be afraid! Gather some supplies and watch this tutorial video. Supplies and measurements listed after the video.

Here's the video tutorial:


Supplies and measurements:

Waterfront stamp set (146386)
Smoky Slate card stock (131202) 5 1/2" x 8 1/2" folded in half, card base
Basic Black card stock (121045) 4' x 5 1/4"
Watercolor Paper (122959) 3 3/4" x 5"
Aqua Painter (103954)
Stampin' Spritzer (126185)
Memento Black ink pad (132708)
Night of Navy ink pad (126970)
Pool Party ink pad (126982)
Wisteria Wonder ink pad (1216985)
Soft Sky ink pad (131118)
Smoky Slate ink pad (131202)
Washi Tape, wide width one works best
E Block (118484)
Adhesive of your choice. I used Fast Fuse (129026) and Stampin' Dimensionals (104430). Tombo, our Multipurpose Liquid Glue (110755) would also be a great choice.

Here's a look at all of the cards in this series:

Want to purchase a kit?

Kits include the paper supplies and embellishments, all cut and ready to use.

Kit with no stamp set, $16 mailed. $12 picked up.

Kit with Waterfront stamp set. $33 sent Priority Mail, $25 picked up.
Orders for kits with stamp set accepted until March 25. Additional ordering period will be added by request. Contact me for more info, audramonk@yahoo.com.

Ordering online, head to my website and click shop. 
Please use host code 6QEHHC2Z through March 25. 


Want to get all these great crafting supplies at a discount? And until March 31, 2018 an additional two free stamp sets! Join my team! It's a great deal. Go here and click join.

Questions, need help with anything? Just ask!
Stay Crafty!
Audra

Thursday, March 15, 2018

Waterfront Series, #1. Mountain Lake in Greens and Purple

Hi Crafty Friends!


Today starts a four part series using the Waterfront stamp set from Stampin' Up.
Each blog post will feature a tutorial video with all the details on how to "paint" the scene and assemble the card. The supplies needed are listed after the video.


Measurements and supplies needed:

Waterfront stamp set (146386)
Card base, Crumb Cake card stock (120953), 5 1/2" x 8 1/2" folded in half
Tranquil Tide card stock (144246), 3" x 4"
Shimmery White card stock (101910), 2 7/8" x 3 7/8"
Whisper White card stock (100730), 1/2" x 3 1/4"
Pinewood Planks Embossing Folder (143708)
Aqua Painter (103954)
Pool Party ink pad (126982)
Tranquil Tide ink pad (144085))
Wisteria Wonder ink pad (126985)
Adhesive of your choice. I used Fast Fuse (129026) and Stampin' Dimensionals (104430). Tombo, our Multipurpose Liquid Glue (110755) would also be a great choice.

Here's a look at all of the cards in this series:


Want to purchase a kit?
Kits include the paper supplies and embellishments, all cut and ready to use.
Kit with no stamp set, $16 mailed. $12 picked up.
Kit with Waterfront stamp set. $33 sent Priority Mail, $25 picked up.

Orders for kits with stamp set accepted until March 25. Additional ordering period will be added by request. Contact me for more info, audramonk@yahoo.com.

Ordering online, head to my website and click shop. 
Please use host code 6QEHHC2Z through March 25. 

Want to get all these great crafting supplies at a discount? And until March 31, 2018 an additional two free stamp sets! Join my team! It's a great deal. Go here and click join.

Questions, need help with anything? Just ask!
Stay Crafty!

Audra


Wednesday, March 7, 2018

Blossoming Basket Bundle, ICS Blog Hop

Hi Crafty Friends!
We're in the last month of Sale-A-Bration, can you believe it? Only a few more weeks to earn the awesome free products. Today I am blog hoping with the Inspire, Create, Share team. We are featuring, you guessed it, SAB items! And the newest ones are wonderful!


My project today uses the Blossoming Basket Bundle. And it really is a bundle of awesome. The bundle is available for free with a $100 or more purchase. It is a stamp set and maybe the best part, the Basket Weave DynamicTextured Impressions Embossing Folder. Whew, that is a mouthful, but it's that wonderful!

I love Stampin' Up and I love my team. And I love to let my team know how much I appreciate them. I like to send them thank you cards in the mail (I mean, I am a card maker after all). I am very excited about this month's card. Let's take a look.


I mean, can you believe this embossing folder? This card has the basket and butterfly heat embossed in white on Sahara Sand card stock. I used sponge daubers to color the basket and the flowers (ink-Sahara Sand and Calypso Coral) and then a Blender Pen to color the leaves (ink- Pear Pizzaz and Pool Party). I then fussy cut the basket and butterfly out with my Snips. The greeting is part of one of the sentiments in the set, but I used a Soft Suede Stampin' Write Marker to just color in the "for you" words. A doily and some Calypso Coral Ombre Ribbon finish off the look. The basket is popped up on some Stampin' Demisionals.

I was really happy with the card, but then I started thinking, I need to make a few of these (want one? Join my team and I'll send one your way) and maybe we should make this card in class this month? So I decided to re-design it so that fussy cutting wasn't necessary.


A little bit different, but just as nice, I think. I stamped and heat embossed the basket on a piece of Sahara Sand card stock cut to 3 1/2" x 3 1/2". The backing white piece is an 1/8 of an inch bigger. Then I changed up the greeting banner, doily, and ribbon a little bit. Isn't it fun how just a few small changes make the card different. ** I used the Blender Pen to color the flowers and basket instead of the sponge daubers.

Let"s take a look at the card together.


Thanks so much for stopping by. I hope you have fun using your Blossoming Basket Bundle. If you need one, head on over to my online store--click that shop button on the right.

For more Sale-A-Bration inspiration, click HERE or the arrow below to see what Shirley has to share.


Tuesday, March 6, 2018

Paper Pumpkin Wildflower Wishes Alternatives

Hi Crafty Friends!

I missed the Paper Pumpkin blog hop I normally participate in, but I wanted to share my ideas with you anyway. I love February's Paper Pumpkin kit. And the thing I like most about it is the flower stickers! Seriously, they're awesome! And there were so many of them!

I'm getting things ready to go to a three day scrapbooking retreat. I will be putting together my 2017 album. I know I am way behind, but it is what it is. And with memory keeping on my mind, one of the first things I thought of when I saw this kit was using the stickers on a scrapbook page!

So have a look!


I went pretty traditional here. I thought all the flowers would complement a spring layout perfectly. This is from Easter when my son played tympani at a local church. And the weather was really lovely. Here's a closer look:


Then, I kept playing with the things in the kit. I made this cute card:


And then I decided to keep going and I made all of these cards to send to my customers to say thank you for their orders this month.


I added some extra paper and some of our note cards and I made 22 cards! How awesome is that? I'm visiting my brother in Utah for a week, so on the plane flight I wrote out all my thank you cards.


I really enjoyed this kit and I'm looking forward to next month when Paper Pumpkin celebrates it's 5th birthday. I'm sure that kit will be amazing and there's going to be a free gift. You need to sign up by March 10th to receive that month's kit. The kits are $19.95 a month or you can prepay for a subscription and earn a free Sale-A-Bration item. The kits make great gifts too! Shop subscriptions in my online store or sign up for month to month at this link Contact me for more info. And check out this cute little video on all the fun.


Thanks so much for checking out my blog post today. I am so happy to share crafting fun with you. 
As always, stay crafty!