Tuesday, September 17, 2019

Mini Legal Pad Folder Covers with Video Tutorial

Hi Crafty Friends!
Better late than never...I am finally getting to sharing how to make the mini legal pad folder covers made with card stock. 


I used Mossy Meadow and the Magnolia Lane DSP.


The mini legal pad tucks into one of the pockets. I used adhesive velcro to close the folder.


Measurements:
Card Stock, 2 pieces:
1 at 5 7/8 x 11, score short side at 5 1/2 and long side at 2 3/4.
1 at 8 x 11, score short side at 3/8, 5 7/8, 6 1/4 and long side at 2 3/4.
DSP:
1- 3/4 x 5
1- 1 1/2 x 8
2- 5 1/4 x 8

You'll need tear tape or liquid glue to attach the 2 pieces of card stock together. 

The video gives the full instructions.


These are quick and easy to make. I think they would make great gifts or items for a craft fair.

You can shop for all the supplies used here: audramonk.stampinup.net.
Have questions? Let me know.

Here are the projects I made for my team using Stampin' Up pocket folders.
I used a tutorial by Christy Wright. She did a great video tutorial on it. Christy's tutorial
Depending on your folder, you may need to tweak things just a bit as I did for the green folders.


And here are the ones I made from file folders. You can see the instructions for them here: https://thecraftyyogi.blogspot.com/2019/09/notebook-covers-with-non-pocket-folders.html


Stay Crafty!
Audra

Saturday, September 14, 2019

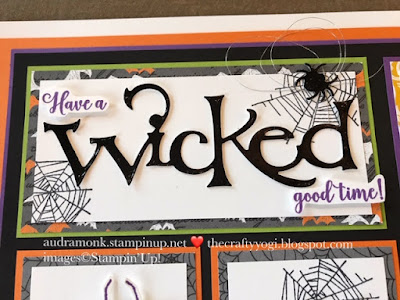
Wonderfully Wicked, A Halloween Framed Art Sampler

I love spooky fun! And I had a wickedly good time making this Halloween sampler. 
Read on for all the info: measurements and supplies used.
My in studio class is coming up on September 7th at 7. There is limited seating, so sign up now by email, audramonk@yahoo.com or on my website, audramonk.stampinup.com.


Measurements in inches:

Whisper White, 9 x 9
Pumpkin Pie, 8 1/2 x 8 1/2
Gorgeous Grape, 8 1/8 x 8 1/8
Basic Black, 8 x 8
Rectangles (2), Whisper White, 2 x 4 1/2, DSP 2 1/4 x 4 3/4, Granny Apple Green, 2 3/8 x 4 7/8
Squares (5), Whisper White, 2 x 2, DSP 2 1/4 x 2 1/4, Pumpkin Pie/Gorgeous Grape, 2 3/8 x 2 3/8
9 x 9 Belmont Shadowbox frame from Michael's


I used different designs of the Monster Bash DSP to back my stamped pieces.  The font on this  Wicked die is so fun.  It shines in our Black Foil paper. The spider has a swirl of our Silver Thread behind it. I stamped in Gorgeous Grape and then fussy cut out the small word sections, they are popped up on Dimensionals.


I love this pumpkin from the Harvest Hellos bundle. And I really love this cute cat and the bat from the Wonderfully Wicked stamp set. There are no dies, so remember, fussy cutting is fun. The Happy Halloween is from the To Every Season set.


This spider is full of creepy good fun as well as all the scary stuff in these jars from the Spooktacular Bash set. I colored them with Stampin' Blends.


And this raven! He's definitely spooky. He's from the perfectly named, The Raven stamp set. I colored him with the Dark Highland Heather Blend.


Aren't these scary portraits and frames from the Spooktacular bundle the best? I colored them with our blends. I used Silver Foil paper for the fancy frames.


So there you go! I hope you have a spooktacular good time if you make one. If you have questions, let me know. Ordering supplies? Order here: audramonk.stampinup.net. Use host code ZFPYFQGM by Oct1 and I'll send you a little something spooky in the mail.

Stay Crafty!
Audra


Sunday, September 8, 2019

Notebook Covers with Non Pocket Folders

Hi Crafty Friends!
It's all about using folders today. A bit random, I know. I'll explain just a little but the video has all the details. So, a bunch of people decided to join my Stampin' Up team (such an excellent decision!) and I was looking for a cool handmade gift to give them. I saw another demo friend with one of these cute notebook covers. She was given it by her up line, so I asked her how she made it, and she sent me a link. I followed a tutorial by Charity Wright, Stampin' with Love. Charity (who I don't know) did a great job. So short of it is, I decided to see if I could make something similar using a file folder, as I had some from the last On Stage event I attended.


Isn't it so cute? 
Here are the basic measurements, note that some things will vary depending on the size of your file folders. There is definitely a bit of experimentation required. The video will give more details.

To create the pockets of the notebook holder, cut the folder 2 3/4 inches from the fold line.
With it folded on the line, cut the folder to 8 inches (or leave the decorative top like this one).
Open the folder and cut it to 11 1/4 inches.
From the left with the inside facing you, score at 5 1/2 and 5 7/8.

Check out the video for all the info:


I got the mini legal pads from Amazon. I made up all the folders I had, it's quite fun really.


Here's the project with the pocket folders.


I've also figured out a way to make the notebook covers with 8 1/2 x 11 card stock. It uses two pieces. So, look for that post coming soon.

The card stock cover post is up! Click HERE to see it.

Stay Crafty!
Audra


Wednesday, September 4, 2019

ICS Blog Hop, Gather Together

Hi Crafty Friends!
It's such a fun time of year in the crafting world. The 2019 Stampin' Up Holiday Catalog is LIVE! 
It's time for holiday crafting. Christmas crafting, Halloween crafting, and Fall crafting. Fall crafting is what we are sharing with you today on the ICS Fabulous Fall Blog Hop.


I'm sharing a project made with the Gather Together Bundle. I love Fall, the colors, the cooler days, and the sentiment of gathering together (and the pumpkin everything!). This bundle has a stamp set with lovely sketched leaves and pumpkins and some beautiful sentiments. There is a die set, with dies that can cut out some of the stamped images, PLUS three embossed leaf dies.

I decided to play with the embossed leaf dies and our new Delicata Metallic Ink Pads.


I think this card is simple and sweet, and it's pretty easy to make too. 
The leaf is made by inking the embossing and cutting die. So cool! This was not an idea that came from my head, but I saw another demo post it and wanted to give it a try. 


This is the new gold ink. I definitely think I need to order the copper now!


Push the die down a bit to get good coverage. 


Then place it inky side down on your paper and run it through your die cutting machine.


When I was finished, I just rinsed the die off with water and dried it well.
So maybe you'll give this technique a try? Let me know if you do!

For more inspiration, click HERE or the next button below to see what Terri has to share.


We'll be making this card in my Just Cards Class on September 13th at 9:30am and 18th at 7pm. You can see the details about this class and my other offerings on my website.

If you don't already have a demo, I'd love for you to shop with me!
Contact me for more info, audramonk@yahoo.com.

Best wishes on all of your holiday crafting!
Stay Crafty!
Audra