Thursday, August 30, 2018

It's A Paper Pumpkin Thing, Blissful Blooms Thank- Yous

Hi Crafty Friends!

It's time for A Paper Pumpkin Thing Blog Hop. This month's kit featured some beautiful pre-printed watercolored cards. It's a pretty simple kit, and I had lots of fun playing with it.


I made this really neat card.


It's so cool how just cutting apart the card and then mounting it on some black card stock can be. I got really excited to make more. I am planning to send them to my Paper Pumpkin subscribers to say "thanks for subscribing with me".

I added a Flirty Flamingo card base to contrast and complement the Basic Black background and the pre-printed card.


I was having such fun making them (I mean really! Aren't they lovely?) and then I realized that for this blog hop we're supposed to have a non-card project too! So I checked my box and I was down to just 2 cards! (I used some of the other cards for a tutorial). So, I decided to make some sort of cute little box. I saw one in our demo group that could hold some tea bags or other small treats, and I decided to give it a try. I used a tutorial by Sandra Ronald, at artypapercrafters.com. 
It's such a cute and sturdy box!


I had enough printed paper to cover the front, back, and top. I stamped the sides with the flower stamp from the kit in Blackberry Bliss.


This would be such a great set to give. Or the boxes would be awesome for a shower thank you gift. And now check out what I made with my very last card from the kit (as I needed more thank you cards to send).


Thanks so much for checking out my blog today. 

September's kit is going to be full of spooky fun. If you like treat giving, you should subscribe here, https://www.paperpumpkin.com/ by Sept 10 and choose me as your demo (if you don't have one already).


For more inspiration, click on the names below.

Stay Crafty!
Audra


Monday, August 20, 2018

Stampin' Up! Display Stamper Post

Hi Crafty Friends!

Today I'm sharing a variety of projects. I'm posting them as part of my application to be a Display Stamper at the upcoming Stampin' Up! On Stage event. Attending the On Stage events are one of the percs of being a demonstrator (want to know more about that? Contact me for more info). 

On Stage is a gathering of demos with presentations from the home office as well as from other demonstrators. It's a time filled with inspiration and meeting with new and old stampin' friends. And I'm hoping to be part of the inspiration! Display Stampers receive a sampling of totally new product and are asked to create projects to share on display boards at the event. I was chosen a few years ago and it was very challenging but very fun. I'm hoping to get chose again. (Pick me Stampin' Up!)
So wish me luck and let me show you some things I've been working on.

I'm most excited about my Framed Art Sampler. We'll be making this one in class at the end of November so that we can display it all of December. Don't worry, I'll do a more detailed post about it soon. This is the first project I made with my new Holiday catalog products. I was very much inspired by the beautiful ideas in the catalog.


I love the magical Christmas feeling of this piece. Here's what it looks like framed up.


**Update** Want all the info on how to make the sampler? Click HERE to go to the blog post.

We have another Home Decor class coming up the beginning of September, our HOME frame. It's a follow up to the first class we did back in the spring. We're making more "0"s to go in our frame. 


It's such a fun project and I love changing out my "O" every month. Please note, this was not my original design. I learned it from another demo, but I've had such fun coming up with ideas for the "O"s. This class is on Sept 5, so get you RSVP in quick! If you missed the first class and need to make the whole project, that's no problem as that option is available too. 
Here's a closer look at the 'O"s.


This next pic shows how lovely they look in the frame. We'll also make a Valentine's one, I'm waiting on a stamp set to arrive so that I can design that one.


Now, let me show you a few cards.

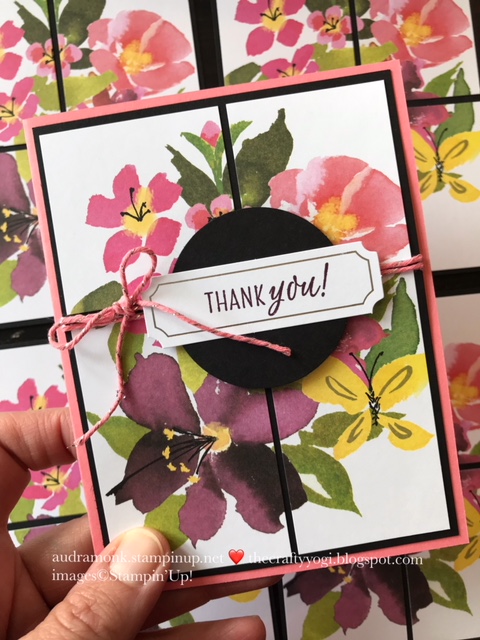
We made this sweet card in my classes this past week. It features the Pop of Petals bundle (so cute!) and the Stitched Labels Framelits. 
My next two cards use new products from our soon to be shop-able Holiday Catalog. 
Need one? Just ask!


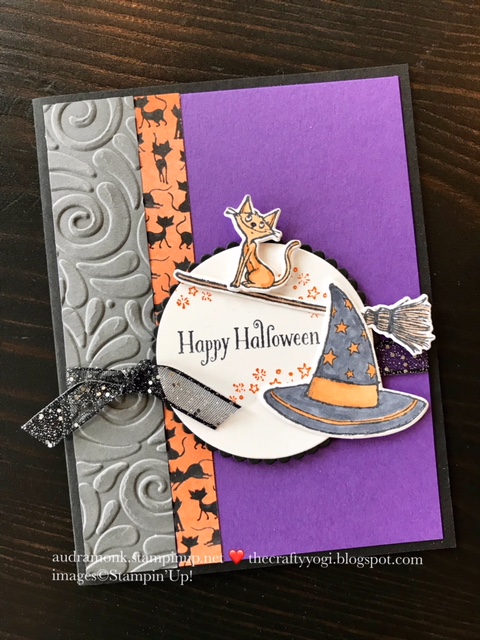
I adore fun spooky Halloween stuff! I had lots of fun making this card. It will be one of the make and take options at my Open House on September 9th. This new set is called Cauldron Bubble. I love this saucy little cat. Here's a closer look:


My last card share is this fun and quick Christmas card. It uses a stamp and the punch from the Christmas Traditions Punch Box. And the new Sprig Punch. 
We'll be making a variation of this at my Open House.  


Last up, I'm sharing a scrapbook page.  I love scrapbooking. I love being able to look at and share my pictures. (Really! We must not leave our pictures trapped in our phones) And I've got plans to offer a scrapbooking class or club soon. So keep your eye out for that. I love pocket scrapbooking and using our Memories and More cards packs. I also like a more traditional scrapbook page. For this page, which focuses on just one picture, was made using supplies and stamps from one of our Paper Pumpkin kits. 
I'm planning to use this page for my son's birthday coming up in December.


Thanks so much for checking out my blog today. I shared a wide variety of projects. If you need  more detailed information, let me know. 
The 2018 Holiday Catalog will be available for ordering on Sept 5.

Stay Crafty!
Audra


Thursday, August 16, 2018

A Fall Framed Art Sampler

Hi Crafty Friends!
As Summer winds it way down, a crafter's mind turns to all the fun Fall and Winter crafts. Today I am sharing my Fall framed art sampler.


This sampler features products from our Annual Catalog and from the all new Stampin' Up! Holiday Catalog (in which shopping will be available starting 9/5). Need a catalog? Let me know.

Let's get all the measurements:

Whisper White, 9" x 9"
Crushed Curry, 8 1/2" x 8 1/2"
Cajun Craze, (I just love this color!) 8 1/4" x 8 1/4"
Square: Mint Macron, 4 3/4" x 4 3/4", Country Lane DSP, 4 1/2" x 4 1/2", Country Lane DSP, 4" x 4", Galvanized Metallic Paper, 3" x 3", Whisper White, 1 1/2" x 3 1/2"
3 Small Squares:  Mint Macron, 2 1/4" x 2 1/4", Country Lane DSP, 2" x 2"
Rectangle: Mint Macron, 2 1/4" x 4 3/4", Country Lane DSP, 2 1/4" x 4 3/4"

Let's take a closer look:


This square has a Stitched Shapes Framelits circle in Crumb Cake. I used the set called Many Blessings. I colored the image with our Watercolor Pencils. Then I fussy cut out the 3 bigger flowers and popped them up on a Stampin' Dimensional.


Our Large Letters Framelits are front and center. I used the new Galvanized Metallic Paper. The letters are accentuated with a few little flowers and some leaves from the Rooted in Nature set. 


Our catalogs are like inspiration books. This square is inspired by a framed art piece in the new Holiday Catalog. I've used the totally awesome new Tin Tile Dynamic Impressions Embossing Folder. The sentiment is from the Country Home stamp set. There's a length of Copper Trim as well as a Stitched Shapes Framelits circle in Crushed Curry. The sentiment is from the Country Home set, Since I use a 9" x 9" shadow box frame, I used Dimensionals generously. 


I put two squares here, but then ran a piece of Burlap Ribbon vertically across them. The top leaves are from the Rooted in Nature set, stamped in Mint Macron and Blackberry Bliss. The two Cajun Craze leaves are from the Falling for Leaves bundle. I added some Leaves Trinkets and an 8" piece of the Nature's Twine tied into a bow.


Thanks for having a look at my project! If you need help with products, measurements, or anything else, let me know. I'm here to help with your crafting needs!

Stay Crafty!
Audra


Thursday, August 2, 2018

August's Class to Go, Blended Seasons

Hi Crafty Friends!
It's time for August's Class to go. 
This month we're creating with the limited edition Blended Seasons Bundle. 


This set is only available through the month of August as supplies last.
It's such a cool set. There's something for every season of the year. And perhaps the most awesome part of the bundle is the framelits. There are stitched framelits! They have stitching on both edges, so you use both the die cut part and the part left behind.
Let's take a video look at the elements and the cards.


Here are pictures of the projects:


So fun, right? 
Recommended additional products: StazOn Ink Pad, and Aqua Painters

Class Options:

Option #1

This bundle is the full deal! Everything you need to create the cards and many projects.
Blended Seasons Bundle
Watercolor Pencils Assortment 2
Card Kit, supplies to make 2 each of 3 designs, Video Tutorial
Bonus 8 pieces of Shimmery White paper cut to 4" x 5 1/4"
FREE StazOn Ink pad (or $10 value substitution)
$90 (plus $7 shipping if needed)

Option #2

Blended Seasons Bundle
Card Kit, supplies to make 2 each of 3 designs, Video Tutorial
Bonus 8 pieces of Shimmery White paper cut to 4" x 5 1/4"
$75.50 (plus $7 shipping if needed)

Option #3

This is for those who have the bundle already but want the paper cut.
Card Kit, supplies to make 2 each of 3 designs, Video Tutorial
$20 (plus $4 shipping if needed)

Option #4

Just want the Video Tutorial?
$15

Option #5

On my team? Order the bundle yourself, getting the demo discount.
Card Kit and Video Tutorial
$12 (plus $4 shipping if needed)

Contact me by email, audramonk@yahoo.com for the payment link.
Orders must be payed for by August 10, so that I can order the products and then prepare the card kits. Kits will be available/posted around August 25.


Stay Crafty!
Audra


Wednesday, August 1, 2018

A Color Challenge, A Marbled Background, it's an ICS Blog Hop

Hi Crafty Friends!
Welcome to August and to the ICS Blog Hop. This month we are doing a color challenge!


Take a look at the colors in the challenge:

All strong, beautiful colors. When I saw them, my mind was immediately drawn to the Tropical Escape bundle. OK, I'll admit I've been using it a lot. But it's summer in the US and the stamp set and framelits are so wonderful. I decided to add in the Marbled Background stamp. 


It's bold and beautiful, I think. And perfect for a summer birthday card. The sentiment is from the Beautiful Bouquet stamp set. To get the different colors in the background, I used sponge daubers to dab the ink onto the Marbled stamp. And if you're thinking, "where did those stitched framelits come from?" I'll tell you! They're from a new limited addition set called Blended Seasons. And it's only available for the month of August (or while supplies last).


It's such a great set. And I'll admit, I'm using the framelits on everything!

Thanks so much for checking out my project today! For more color inspiration, click HERE or the button below to see what Debbi has to share.


I always glad to share crafty inspiration with you. Have questions? Need help ordering? Just ask.
Stay Crafty!
Audra