Greetings Crafty Friends!
I'm writing this blog post on the cusp of the new year. It's about 9:30 on New Year's Eve. I'm nestled in on the couch under a warm blanket (it's been 30 degrees or below for days) while my sons and husband play a video game together. As a mom of three college/grad school kids, the winter break has become one of my favorite times of the year.
And now we'll celebrate the fun stuff of winter with January's framed art sampler.
The sampler is in a 9" x 9" shadow box frame. I usually buy them from Ikea or Michael's.
Here are all the measurements:
9" x 9" Whisper White
8" x 8" Night of Navy
Top panel: 2 1/4" x 7 1/4" Marina Mist & 2" x 7" Whisper White
4 squares: 2 1/4" x 2 1/4" Whisper White & 2" x 2" Marina Mist
Bottom right panel: 2 1/4" x 4 3/4" Whisper White & 2" x 4 1/2" Marina Mist
Let's take a closer look and I'll share the stamp sets I used. I used pretty much every snowflake stamp I own. Some are retiring and only available through Jan 2, 2018, so if there's one you like, order it quick! But, you can really use whatever snow flakes you have.
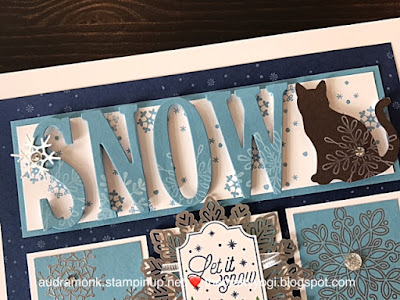
The Night of Navy base is stamped with the snowflakes from Christmas Pines stamp set (Annual Catalog) in Whisper White Craft Stampin' Ink. The Whisper White background is stamped with the two small snowflakes from the Merry Cafe (Holiday Catalog, retiring) set in Marina Mist ink. The letters are stamped with the snowflakes from Snowflake Sentiments (HC, carrying over). They are die cut with our Large Letters Dies. The circle behind the mittens is die cut with the Stitched Shape Framelits and stamped in Whisper White with the Snowflake Sentiments stamps. The mittens are stamped in Early Espresso ink with the Smitten Mittens set (HC, retiring) and die cut with the Merry Mittens Framelits, they are "attached" with 3 1/2" of Linen Thread.
Another idea/option is using the Cat Punch (HC, carrying over).
This center panel features the stamp from Merry Little Labels (HC, retiring). I colored it with my Stampin' Write Markers, Garden Green, Early Espresso, and Night of Navy. It's punched with the coordinating Every Day Label Punch (HC, carrying over). Backed with 7" of Silver 1/8" ribbon (AC). And then backed by one of my most favorite embellishments, a Foil Snowflake (HC, retiring).
The two side panels feature silver embossed snowflakes. The left from the Colorful Seasons set (AC) with a Rhinestone in the center. The right panel is the medium sized snowflake from the Flurry of Wishes set (AC) with a Faceted Gem at the center.
The bottom left corner is the small cup from the Coffee Cafe set (AC) cut out with the Coffee Cup Dies. And embellished with a snowflake from the Seasonal Layers Thinlits and a rhinestone. There's some Wink of Stella on the whipped cream.
To make this right lower panel, start with a piece of Whisper White card stock cut to 2" x 4 1/2". Die cut it with one of the rows of houses from the Hometown Greetings Edgelits (HC, carrying over). The background is stamped with the Christmas Pines snowflakes.
Whew! I'm hoping I covered everything. Any questions, let me know. I'm going to enjoy having this on my cabinet all month.
Happy Creating!
If ordering online (audramonk.stampinup.net) please use host code, JWMWNHGK.
Stay Crafty!
Audra


