Tuesday, August 29, 2017

Holiday Catalog Swap Time

Hi Crafty Friends!

It's Holiday Catalog swap time!
There are lots of perks about being a Stampin' Up demo. One of them is that we can order from the new catalogs early. If you love craft supplies, you know how exciting it is to get new ones.
And we of course get a great discount on all our products. 
(And it's always a good time to join my team).

A fun thing that many demonstrators do is called a swap. It's a great way to get lots of different samples to share with our customers. Sometimes we swap at Stampin' Up events, and sometimes we swap by mail. I'm participating in a mail in swap focusing on the Holiday catalog. So I made 22 super cute cards and sent them off in the mail and next week I'll get 22 cards back in the mail.

Here is my swap, featuring the Merry Cafe stamp set that works with the Coffee Cup framelits from the annual catalog.


It's so sparkly and cheerful, right?
Let's talk about the sparkle first. I embossed with silver embossing powder, the word cheer. There is a silver snowflake, silver sequin trim, and rhinestones! So. Much. Sparkle. There is also some Real Red 1/8" Solid Ribbon. The Designer Series Paper is called Quilted Christmas (3" x 3" and backed with a piece of Real Red ( 3 1/8" x 3 1/8"). And I dry embossed the Whisper White card front ( 4' x 5 1/4") with the Softly Falling embossing folder. The card base is Garden Green.

For me, one of the more interesting things about swap cards is making multiples of the same card. So next is a little bit about how I did mine.

I stamped the cups and lids on half sheets of Whisper White card stock. Then I stamped and embossed them, then I cut out all of the pieces with my bigshot.

I have been having a few issues with my knee, so I assembled most of the parts and the cards while propping up and icing my knee. Mini Glue Dots were the adhesive of choice here.

Once I had all of the separate elements prepped, I was ready to make the cards.

It does look really cool as you start to build a pile of card elements.
Once they're all done, I pack them up and send them to the demo who is hosting the swap and then next week I'll get an envelope in the mail with the other participants cards. Check back here in a couple of weeks, maybe after Sept 8 and I'll update with a photo of the swaps I receive.

To finish up, here's a close up of the main decorative part.


Thanks so much for stopping by.
Stay Crafty!


Friday, August 25, 2017

Infinity Card, Stampin' Up Style with Video Tutorial

Hi Crafty Friends!

I have a very fun tutorial (with video) to share with you today. Let's make and infinity card!

We are making one of the infinity cards and 4 other fun cards at my Stampin' Fun class on Sunday August 27. (Pics way at the bottom of this post). 
I have a full schedule of classes posted on my website, or my Facebook page
I also offer all of my classes "to go." Priced either by the packet or free with a qualifying purchase through me or online with a host code. Contact me for more details.


I've made two cards to share with you. Both use the Happy Birthday Gorgeous stamp set.
Here's a video so you can get a "feel" of how awesome the cards are to play with.


Isn't it so cool? It's so cool you know you want to make one! Here's the how to video. 
Measurements and products used are posted after the video.


6 x 6 Infinity Card

4- 3" x 6" pieces of Basic Black card stock.
Score at 1 1/2" on each side on all 4 pieces.

DSP pieces:
8- 2 3/4" x 2 3/4"
8- 1 1/4" x 2 3/4"
8- 1 1/4" x 1 1/4"

Front squares:
Whisper White, 1 7/8" x 1 7/8"
Colored Card Stock, 2" x 2"

Whisper White for message writing, 2 1/2" x 2 1/2"
(in the video I stated this wrong, so use the written measurements)

Here are pictures of all 4 sides of each card:


Whole Lot of Lovely DSP, stamps sets, Happy Birthday Gorgeous, and Lot's of Love.


 Punches used here, Pretty Label and Classic Label, and 3/4" Circle.
I fussy cut the flower on the left panel.


Next version:


Pick a Pattern DSP, stamp sets, Happy Birthday Gorgeous (isn't cool how the set works for a feminine and a masculine card??) and Pieces & Patterns.


Mammoth and Dinosaur cut out from the DSP.


Thank you so much for stopping by. I hope you make an infinity card and that you love them as much as I do. If you have questions or want to buy any of the supplies to make the card, please let me know. I will be super happy to help!

Here's the full class:


And to finish things off today, a very cute dog pic:


Thank you so much for visiting my blog. I hope it has been helpful and fun.
Stay Crafty!


Wednesday, August 9, 2017

Fall Sampler Framed Art

Ahh...Fall, I love it! The cooler temperatures, the changing colors of the leaves, the back to school energy. Fall on the east coast is a truly lovely thing. And celebrating it with my paper crafting supplies makes it even better.

That's one of the great fun things about paper crafting, you can celebrate the seasons, any time! I mean, my last post was about Christmas cards (super fun!) and now I'm talking about Fall. And tomorrow, I might celebrate Summer...it's all good!

My Sampler Framed Art classes are going well. We meet once a month, usually the last Wednesday of the month to make the sampler for the next month. So, they're somewhat related to the upcoming month's season. Love a sampler a lot? Hang it or display it year round, that's what I'm going to do with my nautical one, I think it's going in the bathroom. 
Like change? Just swap out the sampler for a different one!

May I present to you....Fall!


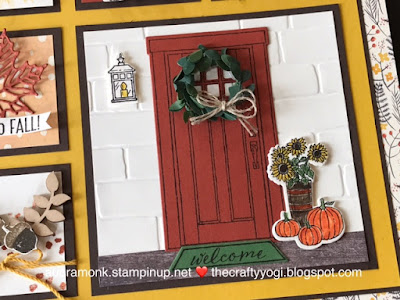
Isn't it lovely? We're using the 9 x 9 Ribba shadow box frames from Ikea. They're $10 US. The shadow box feature allows the design of the sampler to have 3D elements, like the Boxwood Wreath (144176) on the door. It also allows for lots of Stampin' Deminsionals! I've used lots of new products from the new Holiday Catalog. Catalogs available for shopping on September 1 (and for Demos now!). Need a catalog or want to join my team, just ask.


The Hello Fall square uses the leaf die from the Seasonal Layers Thinlits, (seriously, you must buy this set!) the sentiment is from the Merry Cafe set, I've snipped it out a part of it. The knotty bit is three strands pulled from our Burlap Ribbon, tied in a knot and attached with a glue dot. The Designer Series Paper for the whole project is called Painted Autumn and it is amazing! The acorns are from the Painted Harvest stamp set, I fussy cut them out. I also used the Touches of Nature Elements and our Crushed Curry Baker's Twine.


Here we have stamps and dies from the At Home With You Bundle. And a little tiny strip of our Wood Textures DSP for the floor.


I've die cut (Large Letters Framelits) out the letter from the DSP that is used for the base layer. I attached the DSP M (use you initial of course) to another M die cut out of a piece of thin chip board that comes in the DSP packs. That just added dimension, and I used Dimensionals too.


The sunflower square might be my favorite! It's from the Painted Harvest stamp set with the coordinating Leaf Punch. I used Crushed Curry ink, stamped off once for the first layer and then full strength for the second layer. And Early Espresso for the center of the flower. The leaves are done the same way in Garden Green and punched out with the Leaf Punch.


I've used several layouts for the samplers. This is the 5th one we've done in class (I've used this basic layout on two of the previous samplers). You can see earlier blog posts for information on the others. This sampler's basic layout measurements are:

9" x 9" DSP base (I actually cut out the center of this piece to use for later).
8 1/8" x 8 1/8' Early Espresso
8" x 8" Crushed Curry
The Very Vanilla and DSP squares are 2" x 2" and the big square is 4 1/2" x 4 1/2"
Early Espresso 2 1/4" x 2 1/4" and 4 3/4" x 4 3/4" backs the "working" pieces

Here's a picture of the sampler with no frame.


And here it is sitting pretty on my sideboard.


The class costs $30 with the frame and $20 for no frame. Class on the 23rd is full, but I can add your name to the wait list or if there's enough interest, I can add another class. 
I can also do a Private Class if you'd like to make this with your friends and family. 
This can be done at your place or mine.

As always, I am here to help you with your crafty needs!
Stay Crafty!
Audra

Contact me by email: audramonk@yahoo.com
Follow me on Facebook: The Crafty Yogi


Wednesday, August 2, 2017

ICS Blog Hop, Carols of Christmas


Hi Crafty Friends!
It's the first Wednesday of the month and I am sharing creative inspiration with the ICS team.

 Our theme this month is Knotty Ways featuring Christmas projects. (Is is naughty to like Christmas crafting and ribbon so much?)  There is an early release this month of the Carols of Christmas bundle from Stampin' Up. It's always a good idea to start early on our Christmas projects. 
So we thought we'd provide you with some inspiration.


I just love the Carols of Christmas stamp set and thinlits bundle. It was available in July for demonstrators AND now that it is August, anyone can buy it. My card today is a peaceful night time scene. It features the new 5/8" Crinkled Seam Binding Ribbon in Night of Navy. 
The ribbon is just so soft and lovely.

Here's a quick video with tips on how to assemble the card and ideas about what adhesives to use.


And just in case you'd like a closer picture, here's a close up of the ribbon.


Scroll on for more samples using the Carols of Christmas bundle!
We'll be using it for two of the cards at my monthly Christmas Card class on August 8.  
Here's a look at the projects we're making.

Aren't they lovely!

Bits of ribbon AND embossing!
This is the 3/8" Metallic Edge Ribbon.

This cheerful card features the 1/4"Double Stitched Ribbon.
And stamps from the Merry Mistletoe set from the annual catalog.

No ribbon here! But it's cute none the less.
It's so cool how you can use the positives and negatives from the dies.

For more Christmas inspiration, click HERE or the arrow below to see what Tammy has to share.


Thanks so much for stopping by. I love sharing with you. 
If you would like to purchase the new Carols of Christmas set, click the shop button or head over to my website, audramonk.stampinup.net.

Stay Crafty!
Audra
The Crafty Yogi