Hi Crafty Friends!
Let's celebrate the goodness of the garden. The hard work and the bounty that the earth can provide. As well as the beautiful flowers that will soon end their blooming as summer winds down.
I really enjoyed making this project. The stamp set is awesome. It's called Garden Goodness (#149250). It's a two step photopolymer stamp set. Since the stems are stamped separately from the veggies, it's easy to use different colors. The Stamparatus makes it even easier! See the video below for tips on how I stamped the peppers.
Measurements in inches:
Whisper White: 9 x 9
Early Espresso: 8 1/2 x 8 1/2
Poppy Parade: 8 1/8 x 8 1/8
Crumb Cake: 8 x 8
Rectangles (3): Whisper White 2 x 4 1/2, Garden Lane DSP 2 1/4 x 4 3/4,
and Early Espresso 2 3/8 x 4 7/8
Squares (3): Whisper White: 2 x 2, Garden Lane DSP 2 1/4 x 2 1/4, and Early Espresso 2 3/8 x 2 3/8
9 x 9 Belmont Shadow Box Frame from Michael's
I stamped the tomatoes in Poppy Parade and the stems in Garden Green. I stamped the tomatoes again on some scrap paper and cut three of them out and popped them up on Mini Dimensionals.
I stamped the peppers in Poppy Parade and Garden Green on the paper and then another pepper in Crushed Curry on scrap. The stems are stamped in Mossy Meadow. See the video below for how to use the Stamparatus (and our shammy) to get perfect peppers every time. The yellow pepper is fussy cut and then popped up on dimensionals.
Need tips on how to line up your stamps on the Stamparatus? See this video:
And back to the info we go...
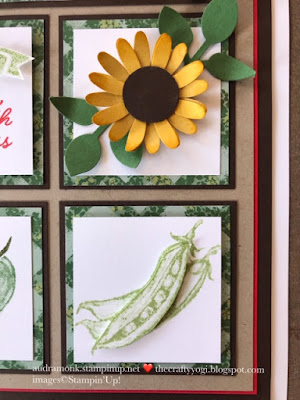
The peas in the pod are stamped in Pear Pizzaz. I went with the stamp the background and stamp some scrap paper process again. I fussy cut just the front pea pod and used dimensionals to pop it up.
I love this sentiment from the stamp set! Good luck, good health and happiness, it's a wish we all can use. The banner is stamped in Pear Pizzaz and the wishing you sentiment in Early Espresso. Some more fussy cutting and more domensionals.
The words stamped on the 2 x 2 square are in Poppy Parade.
Now let's talk about the sunflowers!
I've made two small ones using the Medium Daisy Punch (149517) and the retired 3/4 inch Circle Punch, but I totally think you could use the 1 inch Circle Punch as is or trim it down a bit. The bigger flower is made with the Daisy Punch (143713) and the 1 1/8 Scallop Circle Punch (146138). Each flower uses three of the flowers punched in Crushed Curry and then I sponged the edges in Crushed Curry. The centers are punched in Early Espresso. I curled the ends of the petals with my bone folder and assembled the flowers with Mini Glue Dots. The leaves are in Garden Green and use the Leaf Punch (144667). The leaves are attached with the mini glue dots to the 2 x 4 1/2 rectangle and the 2 x 2 square and then the flowers on top with dimensionals.
And there you have it! It's a great project using just one stamp set.
Come to the Crafty Corner on August 28 and create it or, I'm offering this as a To Go Class.
The Crafty Corner in Studio class is $25 and an additional $10 if you need a frame.
Please rsvp by Monday 8/26 to reserve your spot.
The To Go Class includes the Garden Goodness stamp set ($19.82 value) and all the prepped paper and die cuts (DSP may vary). You'll just need to add ink, some fussy cutting, and adhesive.
The To Go Class is $40, need it shipped? add $8 for Priority Mail shipping.
RSVP with payment by 8/30, email me, audramonk@yahoo.com for details.
Want to order more? A Stamparatus or some ink pads maybe? Spend $50 or more (remember to order your stamp set!) with HOST CODE GZXYAH2Y in my online store and your To Go Class Kit is FREE (stamp set not included). Just pay the $8 shipping if needed.
Ever thought about being a Stampin' Up demo? It's a great time to join the team! Join by 8/31 and get an extra $30 of product! See my website, audramonk.stampinup.net, and click Join The Fun on the right hand side for all the details. Or contact me for more info.
I hope I've inspired you to create something fun for your house or to give as a gift.
If you have any questions, ask away, I am so very happy to help.
Stay Crafty!
Audra


No comments:
Post a Comment