Wednesday, June 3, 2020

SU's New 2020-2022 In Colors, ICS Blog Hop


Hi Crafty Friends!
It's the first Wednesday of the month and I am hopping with the Inspire, Create, Share crew. And boy am I excited to share Stampin' Up's new 2020-2022 In-Colors.


I love this year's colors and I love that the new catalog went live today so that we can order them!! On our demo pre-order, we could get the paper and ribbon. I will be excited to add the ink pads and markers to my order. 
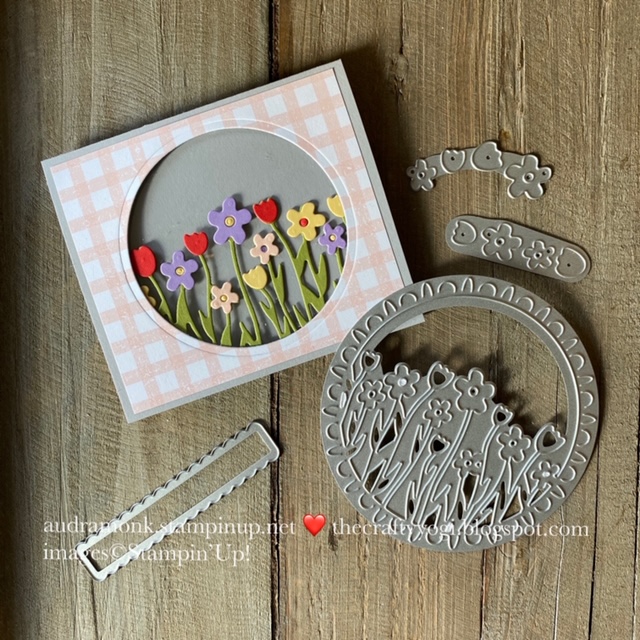
I have a quick and cute card using the Field Of Flowers Bundle to share with you today.


I used all the new in colors except for Just Jade. 
I love how the Magenta Madness pops against the Black.
This bundle will be lots of fun to play with this year.


Thanks for stopping by my blog today! For every day inspiration, follow me on Facebook (The Crafty Yogi) or on Instagram (audra monk). For more inspiration using the new in colors, click HERE or the button below. I'm sure that the rest of the ICS team will have great things to share!


As always, I"m here to support your crafty journey. If you don't already have a demonstrator, contact me if you need a catalog or want to place an order.
Stay Crafty!
Audra


Thursday, April 30, 2020

My Wonderful Family, A Paper Pumpkin Thing Blog Hop

Quick crafting is one of my favorite things. And this month's Paper Pumpkin kit, My Wonderful Family has helped me to make my Mother's Day AND Father's Day cards. 
You'll see all my ideas here as part of the Paper Pumpkin Thing Blog Hop!
Here they are! 2 quick and easy cards using the super cute tree stamp from the kit.
(I need lots of Mother's day cards, so I used all the cards from the kit and then came up with these).


So pretty! And very easy to fussy cut.


You can use your Stamparatus to stamp perfect trees every time!


Quick and easy for making multiples. I cut the yellow strips from the kit in half. and stamped them with the Happy Father's Day sentiment.

Now, you know I can't pass up a cute piece of framed art, and this kit was perfect for this type of project!


Isn't this the cutest?!? The back layer is Early Espresso cut to 6 x 6. 
The Whisper White layers are 5 x 5 and 4 x 4, each backed by a layer 1/8 bigger (Mint Macron and Soft Seafoam)
Almost all the other elements came from the kit! I just added a Stitched Shape Circle and Scalloped Circle.


These 6 x 6 shadow box frames are available from Michael's.

I love adding frames to my home decor!


Thanks for stopping by my blog! If you need help with anything, let me know. 

Stay Crafty!
Audra

For more inspiration, click on the names below:


Friday, April 17, 2020

Spring Sampler with the Parisian Blossoms Suite

A Spring Sampler with Stampin' Up's Parisian Blossoms Suite


Spring is one of my favorite times of the year. I love when we take the dog for a walk around the neighborhood and all the pretty flowers are on the trees. These products and this sampler celebrate that special time of year. OK, I know there's no Eiffel Tower in my neighborhood, but this die is so pretty I had to use it. And I am dreaming of seeing it in person one day.

Measurements:
Whisper White, 9 x 9
Basic Grey, 8 1/2 x 8 1/2
Smoky Slate, 8 3/8 x 8 3/8
Rectangles: DSP 2 x 5, Petal Pink long large rectangle from the new Ornate Layers Dies #152726, Basic Grey 2 1/2 x 5 1/2
Squares: DSP 2 x 2, Petal Pink 2 3/8 x 2 3/8 (embossed with the Parisian Flourish Embossing Folder #151474, Basic Grey 2 1/2 x 2 1/2
Sentiment Piece: Basic Grey long small rectangle from the Ornate Layers Dies, Whisper White 1/2 x 3 3/4

Let's take a closer look at each panel.


I used glue dots and dimensionals to attach the flowers and leaves from the Cherry Blossoms Dies. Plus I sprinkled on some of the Champagne Rhinestones Basic Jewels.


The swirl is in Basic Grey from the Parisian Dies and the flower and leaves are from the Forever Blossoms stamp set colored with Petal Pink and Old Olive Stampin' Blends and die cut with the Cherry Blossoms dies. The Forever Blossoms Bundle (153781) saves you 10%.


The sentiment is from the Parisian Beauty stamp set. I love the new Ornate Gardens Dies, I used them for the big rectangles and the small rectangle behind the sentiment.


The Parisian Flourish Embossing Folder is one of my most favorite embossing folders ever.


And finally, this Eiffel Tower is amazing. The die cuts beautifully!


I hope you are inspired to play with Parisian Blossoms Suite and to celebrate spring with your paper crafting. If you need help with anything, let me know. You can shop 24/7 on my website: audramonk.stampinup.net. 

Happy Crafting!
Audra


Wednesday, April 1, 2020

It's a Girl Thing, Monochromatic Style. An ICS Blog Hop

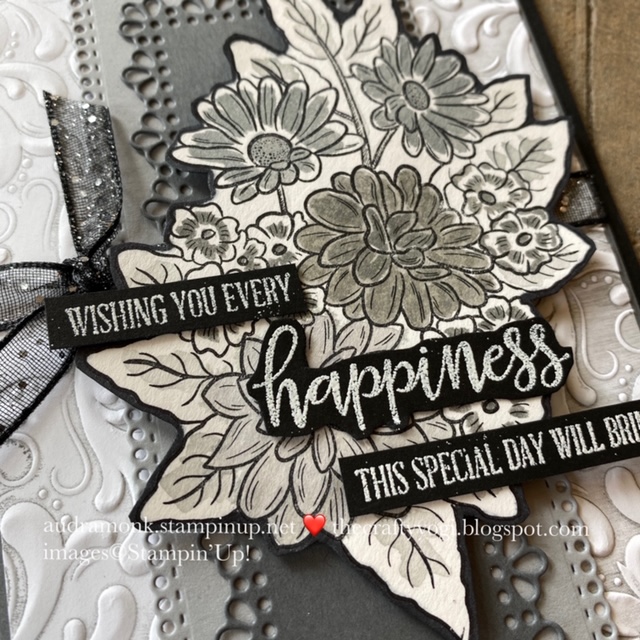
It's time for the ICS blog hop! This month we are featuring monochromatic feminine cards. I decided to use the brand spankin' new, just available today (4/1/20) Ornate Style Stamp set.


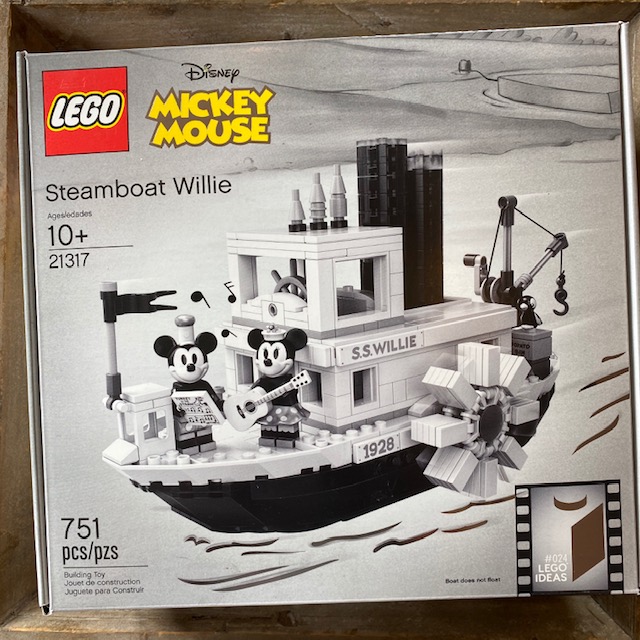
I'm not sure if I've really intentionally made a monochromatic card before. In fact I searched Pinterest a bit to get some ideas. Once I understood the basics, I was thinking what color I wanted to play with and I kept thinking of the Lego set I just bought. I've bought a lot of Lego sets, my oldest son is a huge Lego enthusiast, but I've not bought one for myself, in fact I don't think I've ever built one before. But, I've been admiring this Classic Mickey Mouse one for a long time and last week, it just fell into my Amazon cart and arrived at my house.


It's a black and white set like the old comics! So that's what I decided to go with in my card.
I went over the top on this card, watercoloring, 


fussy cutting, layering fancy new dies, (Ornate Layers Dies)


embossing with ink, embossing with embossing powder, edging the cut out image with Basic Black Blends...


Seriously, I did all the things, and I love this card! And I know just who I'm going to send it to, later in the month for their birthday.


Thanks for stopping by, I hope I've inspired you to try a black and white card! 
Wish me luck on building my lego set! 
For more inspiration, click HERE or the next arrow below to see what Darla has to share.
Stay Crafty!
Audra


If you need a demonstrator, I am happy to help. For regular inspiration, check out my Facebook page (facebook.com/thecraftyyogi) or on Instagram (audramonk).


Thursday, March 26, 2020

No Matter the Weather, It's a Paper Pumpkin Thing Blog Hop

It's time for a Paper Pumpkin Blog Hop.
This kit is so cute! I know I might say that every month, but I guess it's true. I love opening up the box every month to see what fun Stampin' Up has given us.
So with out and further ado, here are some alternate projects using the No Matter the Weather kit.


Of course, I had to make a cute little framed art project. I almost always make one each month. It's a quick and easy way to add some seasonal decor to my home. 
This one is 6 x 6 and looks adorable framed up.


 Then, I made this sweet and softly colored Easter card. 
I just love the cute little bunny peeking out of the grass.


This last card I posted in the Paper Pumpkin Fan Club Facebook group and it got lots of likes, which always makes a person feel good. So, I am sharing it here too. At the end of this post, will be my unboxing video and I'll show you how to make this card.


Thanks so much for stopping by my blog today! Have a great time clicking through all the blogs for lots of inspiration for crafting with your kit. 
Stay Crafty!
Audra

Here's my unboxing video:


Wednesday, February 5, 2020

ICS Blog Hop, Thinking of You

Hi Crafty Friends!
I am super happy to be sharing a few projects with you with this ICS Blog Hop. Our theme this month is Thinking of You. This could be a birthday card or Valentine, or just a card to send to let someone know you are thinking of them.


 Stampin' Up has just released some limited edition products, that coordinate to Sale-A-Bration products as well as products in both of our catalogs. There is a nice selection of Dies (no more fussy cutting!) and some Designer Series Paper. See the flyer images at the end of this post.

My projects feature the Sending Flowers Dies.


I was thinking about creating an easel card, so that the recipient could have the card on view and then I saw a card by an Australian demo, Denita Wright-Smee. So, I pretty much copied her card, as it was a different set of measurements than other easel cards I have made. However, she did not have instructions on how to put it together. So, I figured out what worked for me and then decided to make a video incase you wanted more detailed instructions. But, if you like winging it, cut your card stock to 4 1/4 x 11 and score at 3 3/4 and 71/2.


Here's the video tutorial:


I hope I've inspired you to make a card and send it out to someone who might need some good thoughts. Here's another card made with the same dies. For this one, I die cut the flower circle in Whisper White and colored the flowers with Stampin' Blends.


For more inspiration, click HERE or the button below to see what Deb has to share. 
Thanks so much for stopping by.
Stay Crafty!
Audra


Thursday, January 30, 2020

I'll Bee Yours, A Paper Pumpkin Thing Blog Hop

Hi Crafty Friends!
I'm super excited to share with you today. Sorry it's been so long. Today I am sharing some alternate projects made with this month's Paper Pumpkin kit. I am really loving these kits! Such a great fun way to craft. They are great for beginners and avid crafters.


This month's kit is called I'll Bee Yours. It has the supplies to make 20 mini paper bags and 10 small (3x3) cards. I usually make an unboxing video and create a project or two on Facebook Live. The video is at the end of this post. 
But now, we've got to take a look at this adorable piece of home decor I made.


I seriously love this! And it's so easy! I used our new Heart Punch Pack (151292) that coordinates with the kit (I love when Stampin' Up does that--and they're doing it again next month). I also let the kit guide me with color selection. This project almost looks like a bunch of conversation hearts. I used Crushed Curry, Highland Heather, Mint Macaron, and Rococo Rose. The hearts are on Crumb Cake squares die cut from the Stitched Shapes Dies. When creating a project like this, use as many dimensionals and foam strips as you like! The finished size for this project is 6x6. I put it in a frame from Michael's that is a 6x6 shadow box frame, they go on sale a lot, so stock up when they do.


I also made a cute little card. These small cards are great for tucking into a gift bag. Although, I am planning to make the rest up as full sized cards so I can send them to my customers.


I love that you can make things that have nothing to do with the original kit projects. This cute little card says spring to me, not valentines.

Thanks so much for stopping by my blog today! For more inspiration, click on the names below.


Here's my unboxing video:


Want to subscribe to Paper Pumpkin? Contact me at audramonk@yahoo.com and I can help. Or go to my website: audramonk.stampinup.net.

Stay Crafty!
Audra