Wednesday, December 4, 2019

ICS Blog Hop, Case the Holiday Catalog

Hi Crafty Friends!
Happy December! It's time for the ICS Blog Hop. This month we're casing the Holiday catalog.


What is casing you might wonder? Everyone interprets it differently. Sometimes crafters take it to mean Copy And Change Everything or Copy And Share Everything. I think you can take it both ways. I case a lot. It's hard to create just from your own head, so I am often inspired by looking at projects online and in the catalogs. That's one of the best things about our catalogs, all the samples.

For this month's Just Cards classes, (12/11 and 12/13) I decided to case the catalog for two of the cards. One is a very loose case and one copied the sample more closely. You'll have to check out the catalog or website to see what you think.


This is a gift card holder using the Cup Of Christmas set and the Let It Snow DSP. I'll be posting a video tutorial next week on my social media sites and I'll come back and add it here. It's so cute, the gift card pops up in the center when you take off the belly band and open the card.


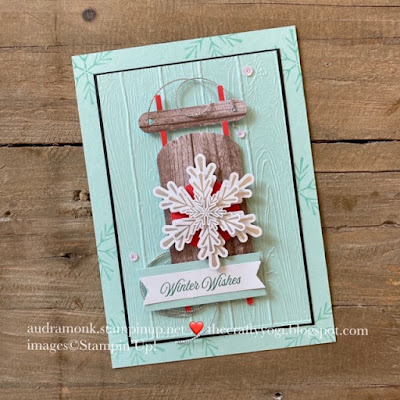
My next card uses the super lovely Snow Front set. This would make a great Christmas card too!


Feel free to case any of my cards. 
For more inspiration, click HERE or the next block below to see what Deb has to share.


Live in the Frederick area and interested in coming to classes, check out my schedule on my website, audramonk.stampinup.net. You can shop for these products there too.


Thursday, November 28, 2019

A Paper Pumpkin Thing Blog Hop, Winter Gifts

Hi Crafty Friends!
Wishing you a very happy and yummy Thanksgiving. I'll be in the kitchen most of the day (I'll get a ride in on my Peloton too) with my grown up kids cooking away as we make our Thanksgiving feast. But I'm sure I'll take a few minutes to hop through this blog hop for ideas on how to use my kit.


I love this month's kit! So many fun die cuts for making lots of great projects. The kit comes ready to make 24 tags. And seriously they are super cute just as intended. But as I'm not normally a fancy tag kinda gal, I'm planning to make cards with mine. Here's a look at one of the tags as intended and one of the cards from the alternate projects included in the instructions flyer.


So pretty, right? 
But, I heard this lovely bits of paper calling out to be small framed art pieces!


I love them! Here's a bunch of pics, unframed, framed...


What do you do when all the paper bits from the kit are gone? You use the stamps to make more tags! I used Whisper White card stock cut to 2 x 6. I folded it in half and used the Tag Topper Punch.


For the holly and berries, I colored with our Stampin' Write markers directly on the stamp.


I think you'll get lots of use out of this month's kit! For more ideas, click on the names below. 
Happy hopping!


Thanks so much for stopping by. Want to order next month's Paper Pumpkin kit? Go to paperpumpkin.com and choose me as your demo at checkout.
Enjoy another pic of these great projects. And if you want an unboxing and video tutorial, click on the video below.

Stay Crafty!
Audra


Saturday, November 2, 2019

A Christmas Sampler 2019

Hi Crafty Friends!
I'm sharing one of my favorite projects today. This year's Christmas sampler.


I wanted to make something different than the other projects I've seen for this year, and I think I did that. This project celebrates some of my favorite things, coloring with our Stampin' Blends, this truck, and buffalo plaid. Let's start with the measurements and then close up pics and product info.

Measurements in inches:
Basic Black, 9 x 9 (we no longer sell this size in 12 x 12, so you could make your base in Whisper White, 9 x 9 and then cut the Basic Black to 8 1/2 x 8 1/2.
Whisper White, 8 1/8 x 8 1/8
Cherry Cobbler, 8 x 8
Rectangles (3): Crumb Cake, 2 x 4 1/2, Whisper White 2 1/4 x 4 3/4, (stamped with the Buffalo Plaid background stamp in Momento Black ink) and Basic Black, 2 3/8 x 4 5/8
Squares (3): Crumb Cake, 2 x 2, Whisper White, (stamped as above) 2 1/4 x 2 1/4, and Basic Black, 2 3/8 x 2 3/8

So first up, we need to talk about the limited edition Christmastime is Here suite.

The Christmastime is Here suite went on sale November 1. It is a full suite with a bundle of the stamp set (2 piece set) and dies, as well as DSP, ribbon, and embellishments. It's absolutely beautiful and if you're thinking of getting it, I wouldn't dilly dally.


This large rose stamp is the main stamp in the suite.


I stamped it in Momento ink and colored it with Blends: Cherry Cobbler, Mint Macron, Mossy Meadow, Poppy Parade, and Soft Suede.


You may have noticed I like this Ride With Me stamp set. But who wouldn't? It's very on trend. I see the image everywhere! On pillows, and signs, and sheets. It's super fun to color.


All Christmas projects need lots of trees! I used the Perfectly Plaid bundle for this quick and easy tree. It's stamped in Mossy Meadow.


The cardinal from the Toile Christmas bundle is so very beautiful.


The banner greeting is also from the Toile Christmas bundle. And the joyful mug, colored in Mint Macron comes from the Cup of Christmas bundle.

I'm offering this as an in studio class on November 13th at 7pm. 

Holiday Sampler Class, 11/13@7pm. $25 for project, $10 for frame, RSVP by11/11. I am so excited about this project and I can't wait to share it with you. This sampler is bold and beautiful and I will help you make it! There is a lot of coloring with our super marvelous Stampin' Blends markers. You need these markers for class and at home! I'll be placing a special order so you can get some of your own. I'll order you 6 sets (Cherry Cobbler, Mossy Meadow, Mint Macron, Basic Black, Smoky Slate, and Soft Suede) for $63, you'll use them in class and you can get your class for half price. To take advantage of this offer, you must pay the $63 by 11/4. Already own those colors, contact me and we'll work out the right order for you. If you want to join us, rsvp soon!

I hope this post has inspired you to create something crafty for your own home. My online store is always open, audramonk.stampinup.net.

Happy Crafting!
Audra


Thursday, October 31, 2019

Cuckoo For You Bundle with Video Tutorial

Hi Crafty Friends! 
I love Fall. But maybe I've mentioned it already? The colors, the cooler temps, the flavors. Fall also hosts my daughter's and husband's birthdays. My husband is a fan of cards that move and cuckoo clocks (I once gave him a cuckoo clock for a birthday present) so I decided to breakout my Cuckoo for You bundle. I had so much fun playing with it that I did my Sunday night Facebook Live on how to put the cuckoo clock door together. You can check out the video below.

Let's start with a few pictures. This is the card I made for my husband on his birthday.


Check out the cute movement on this card.


Then I made a Christmas version. The line drawings are so cute.


Seriously friends, this clock is so cute.


I also made a card without using the clock.


Here's the video tutorial. Hopefully I answer any questions you might have. 


You can purchase this bundle on my website, audramonk.stampinup.net.

Thanks for stopping by! 
Stay Crafty!
Audra


Thursday, October 17, 2019

A Thankful Fall Sampler

Hi Crafty Friends!
I love Fall! I love the cooler days, (don't you just love when you can wear a soft hoodie?) and the colors of the leaves, and everything pumpkin. I channeled all of that love into this month's sampler.


This sampler gives me such a warm feel good feeling. Although I'm kinda thinking I should switch the the leaf and center pumpkin? Anyhow, let's start with some measurements.

Measurements in inches:
Whisper White, 9 x 9
Cajun Craze, 8 1/2 x 8 1/2
Mango Melody, 8 1/4 x 8 1/4
Early Espresso, 8 x 8
Large rectangle: Come to Gather DSP, 2 x 7, Mango Melody, 2 1/4 x 7 1/4, Cajun Craze, 2 3/8 x 7 3/8
Small rectangles: DSP, 2 x 4 1/2, Mango Melody, 2 1/4 x 4 3/4, Cajun Craze, 2 3/8 x 4 5/8
Squares: DSP, 2 x 2, Mango Melody, 2 1/4 x 2 1/4, Cajun Craze, 2 3/8 x 2 3/8
I frame the project with a Belmont 9 x 9 Shadow Box frame from Michael's.


Let's take a closer look at the sections.


This truck, my friends, this truck! I love it. You might remember that I used it in my USA sampler. The stamp set is called Ride with Me, it's in the Annual catalog. Here I colored it with our Stampin' Blends in Pretty Peacock. The pumpkins are colored in Pumpkin Pie and the leaves in Mint Macron. 


I am so getting my money's worth out of this Harvest Hellos bundle. For this project, I stamped the pumpkins in Momento Black ink on the DSP. Stamp two of each, then fold one in half and run a small line of Tombo Liquid Glue down the fold and attach to the other pumpkin. Add the stem in Early Espresso to the back with a Mini Glue Dot.


I had so much fun and I am very happy with the results on coloring this big leaf from the Gather Together stamp set. I colored it with Cajun Craze, Pumpkin Pie, and Mango Melody Stampin' Blends, using both the light and dark markers to get some shading. The center square has another DSP pumpkin, or as in the below pic, you could use a turkey from the Day of Thanks set. I googled turkey images to help with the coloring. I used the same colors as in the leaf.


For the bottom panel, I cut out the letters in Pretty Peacock card stock using the Hand Lettered Prose dies. I attached them with Mini Glue Dots, sometimes you need to fold the glue dots in half. The pumpkins are from the Gather Together set.

I'm hosting the in studio class on Wednesday October 23 at 7pm. See all the info and rsvp under events on my website (you can shop here too!) or Facebook page. You can also email me at audramonk@yahoo.com.

I am so thankful for you stopping by my blog today.
Happy Crafting!
Audra


Thursday, October 3, 2019

A Little Boo! Halloween Decor Frame

Hi Crafty Friends!
Boo!


I made this cute frame a few weeks ago and I've had lots of positive comments and lots of requests for the dimensions, so here they are (in inches). For this project, I used a 5 x 7 shadowbox frame which I purchased from Michael's. They are inexpensive and come in a four pack.

Whisper White for stamping, 2 1/2 x 4 1/2
Basic Black, 2 5/8 x 4 5/8
Granny Apple Green, 3 x 5
Basic Black, 3 1/8 x 5 1/8
Whisper White embossed, 4 x 6
Basic Black, 4 1/8 x 6 1/8
Gorgeous Grape, 5 x 7


These aren't hard and fast numbers! I just play with the sizes and the layers. Then have fun with popping the layers up. I like to use our Foam Strips as they add lots of height. If you are using a shadow box frame, dimensional away!

I used the Wonderfully Wicked stamp set (you might have noticed it's my favorite) and the Hand Lettered Prose Dies.


I hope you have fun making one, if you need help let me know. 
Shop my website for supplies, audramonk.stampinup.net.

Happy Crafting!
Audra


Wednesday, October 2, 2019

ICS Blog Hop, Color Challenge

Hi Crafty Friends!
It's time for some crafty inspiration from the ICS Blog Hop Team.


It's a great day for sharing a super fun card using some very fun colors. I was super happy to see the colors for this month's ICS Blog Hop Color Challenge. 
They're my most favorite colors for fun Halloween crafting.


I love using these colors for cards for my nieces and nephews. They're bright and cheerful and a great complement to some spooky black cats.


I adore the Wonderfully Wicked stamp set (150547). The little cat stamp is my favorite part! I thought it would be fun to stamp her all about, sort of making my own DSP. I've also used a piece of the Monster Bash DSP. 


Thanks so much for stopping by today. If you need help with anything, let me know. 
For more inspiration with this fun color combo, click HERE  or the next button below to see what Deb has to share.

Stay Crafty!
Audra


You can order all the supplies used in this project on my website, audramonk.stampinup.net.
Want to enjoy a discount and get things first? Join my team!


Tuesday, September 17, 2019

Mini Legal Pad Folder Covers with Video Tutorial

Hi Crafty Friends!
Better late than never...I am finally getting to sharing how to make the mini legal pad folder covers made with card stock. 


I used Mossy Meadow and the Magnolia Lane DSP.


The mini legal pad tucks into one of the pockets. I used adhesive velcro to close the folder.


Measurements:
Card Stock, 2 pieces:
1 at 5 7/8 x 11, score short side at 5 1/2 and long side at 2 3/4.
1 at 8 x 11, score short side at 3/8, 5 7/8, 6 1/4 and long side at 2 3/4.
DSP:
1- 3/4 x 5
1- 1 1/2 x 8
2- 5 1/4 x 8

You'll need tear tape or liquid glue to attach the 2 pieces of card stock together. 

The video gives the full instructions.


These are quick and easy to make. I think they would make great gifts or items for a craft fair.

You can shop for all the supplies used here: audramonk.stampinup.net.
Have questions? Let me know.

Here are the projects I made for my team using Stampin' Up pocket folders.
I used a tutorial by Christy Wright. She did a great video tutorial on it. Christy's tutorial
Depending on your folder, you may need to tweak things just a bit as I did for the green folders.


And here are the ones I made from file folders. You can see the instructions for them here: https://thecraftyyogi.blogspot.com/2019/09/notebook-covers-with-non-pocket-folders.html


Stay Crafty!
Audra